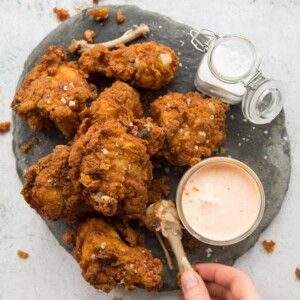
This Buttermilk Fried Chicken recipe is packed with all the tips you need to make EXTRA crispy fried chicken. Once you give this a go, you won’t have it any other way!
Oh boy, is this post a long time coming. I’ve been testing out this fried chicken recipe for a loooooong time, and I’m super excited to finally share with you the tried, tested and perfected recipe! Follow me…

Extra Crispy Fried Chicken
I hope we’re all in agreement that the best fried chicken is mouthwateringly tender on the inside, tooth shatteringly crispy and flakey on the outside and bursting with flavour all over. This recipe will give you exactly that. I’ve packed this post with everything you need to know in getting perfect fried chicken, so let’s start right at the beginning.
What cut of chicken to use for fried chicken?
I always get a whole chicken and cut it up, just because I like the variety. From this, you’ll get 10-12 pieces of chicken (depending on if you split the wing in two or not, here I do).
Best chicken to use for deep frying?
If you opt not to use a whole chicken, just use a variety of different cuts i.e half thigh half drumstick. Just make sure you use bone in skin on chicken. This will result in the crispiest/juiciest fried chicken. I love drumsticks because they’re the easiest to eat, but thighs and wings are also a classic choices. If you’re doing breast as well just make sure you dice in half (keep on the bone) otherwise it’ll be too big to properly cook.

Buttermilk Chicken Marinade
The absolute KEY to getting tender and crispy fried chicken is using a buttermilk marinade. Marinating the chicken in (seasoned) buttermilk tenderises the chicken and injects a huge amount of flavour.
What does marinating chicken in buttermilk do?
Because of its slight acidity, buttermilk has the ability to tenderize the chicken, without it becoming tough and chewy. Using buttermilk also helps the chicken go nice and flaky when you dredge it through the dry mix. As such, buttermilk is great for fried chicken because it a) increases the chance your chicken will come out soft and juicy and b) increases the chances of your chicken coming out crispy.
How long to marinate chicken in buttermilk?
A minimum of 4 hours, a maximum of 24 hours. Personally I very rarely marinate the chicken for less than 12 hours. Some recipes suggest a minimum of 1 hour, but from experience you just don’t get the same results. Some recipes also suggest the marinade stops being effective after 4 hours, but again, from experience I tend to differ from this. Anyway, if you’re going to the trouble of making fried chicken why risk it and shorten the marinading time!?
Alongside the buttermilk you’ll want to add some pantry staple seasonings (all listed in the recipe card). This will be similar to the flour seasoning, just with a few adjustments. Mainly the inclusion of white pepper. This gives you that classic KFC style chicken taste, definitely don’t skip this!
How to marinate chicken in buttermilk (quick summary)
- Pour your buttermilk in to a suitably sized bowl and add your seasoning.
- Stir to combine.
- Add your chicken and fully coat.
- Pop over cling film and marinate in the fridge for a minimum of 4 hours and up to 24 hours.

How to prepare fried chicken
Once you’ve marinated the chicken, it’s time to coat it in seasoned flour.
The seasoning mix is similar to that of the buttermilk, with a few tweaks. The main one is the addition of baking powder. Using baking powder in fried chicken is another crucial ingredient in getting a crispy coating. When the baking powder hits the hot oil it creates lots of tiny air bubbles, which in turn creates an airy and crispy batter.
What is the best flour to use to fry chicken?
You’ll want to use plain/all purpose flour. Some recipes suggest the addition of cornflour, but I don’t think it’s needed here. Because you’ve got the baking powder, it works great with the flour to make a nice and crispy coating. Nothing else needed (apart from the seasoning – of course).
To dredge the chicken just shake off some of the marinade, then coat in the seasoned flour. Really make sure you rub the flour into every part of the chicken so absolutely none of the flesh is showing. It’s too often I see people roll the chicken in the dry rub a couple of times and be done with it. Really make sure you get in every crevice.
How to coat chicken in flour (quick summary)
- Add seasoning to flour and mix. I find this easiest in a small tray, but you could also use a bowl.
- Shake some of the buttermilk off the chicken and one by one coat in the dry seasoning. Really get as much flour in every part of the chicken.
- Give the chicken a little shake.
- Place on a tray ready to deep fry.

Deep Fried Chicken
Of course, to get truly crispy chicken, it’s got to be deep fried.
What oil to use for deep frying?
You want to use an oil with a high smoking point, which essentially means it can go to high temperatures without turning into smoke. You also want a neutral flavoured oil. We’ve already injected enough flavour into the chicken, so no need for a flavoured oil too. For this reason I use vegetable or sunflower oil.
What temperature to deep fry chicken?
You want to get the oil to about 350F/175C. When you drop in the chicken it will drop to about 320F/160C, and that’s fine. To maintain that heat a medium flame should be fine. If it becomes too hot simply pour in some oil to lower the temperature.
How long to deep fry chicken?
Anywhere between 10-15mins, depending on the cut of chicken. I.e wings will probably cook quicker than drumsticks. The crust should be deep golden and the inside white and piping hot. Work in batches of 3 (4 max) pieces at a time.
What is the safe internal temperature for chicken?
According to foodsafety.gov the safe internal temp of cooked chicken is 165F/75C. Do take into consideration it continues cooking slightly when removed from the oil.
How do you tell if fried chicken is done without a thermometer?
The chicken is done when the batter is golden and the inside is white (no pink insight) with the juices running clear.

How to serve fried chicken
Once you’ve fried the chicken, place it on a wire rack to rest with paper towels underneath. I don’t recommend placing straight on to paper towels, this will cause the outside to steam and become soggy (not what you want after all the hard work!) From there, give the chicken a final sprinkle of salt to draw out the last bit of moisture from the batter for extra crispiness.
Sauce for fried chicken
Sides for fried chicken
- Crispy French Fries
- Beer Battered Onion Rings
- Baked Potato Wedges
- Creamy Potato Salad
- Mac and Cheese (or Cheesy Orzo)
Alrighty, let’s tuck into the full recipe for this fried chicken shall we?!

How to make Buttermilk Fried Chicken (Full Recipe & Video)
Buttermilk Fried Chicken
Equipment
- Deep Pot & Tongs (for deep frying)
- Large Mixing Bowl & Cling Film (for marinating)
- Curved Tray or Large Flat Bowl (for dredging chicken)
- Sharp Knife & Chopping Board (if dicing up whole chicken)
- Kitchen Thermometer
- Cooling Rack & Paper Towels
Ingredients
- 3.3lb / 1.5kg Whole Chicken, divided (or individual bone in skin on pieces – see notes)
- 4 cups / 1litre Vegetable Oil, or as needed for deep frying (see notes)
Wet Mix
- 2 cups / 500ml Buttermilk
- 1 tsp EACH: Paprika, Cayenne Pepper, White Pepper, Onion Powder, Garlic Powder, Salt
Dry Mix
- 2.5 cups / 375g Plain/All Purpose Flour
- 1 tbsp Paprika
- 2 tsp EACH: Oregano, Baking Powder
- 1.5 tsp Salt, plus extra to sprinkle at the end
- 1 tsp EACH: Onion Powder, Garlic Powder, Cayenne Pepper, Black Pepper
Instructions
- In a bowl, combine the wet mix with your chicken, ensuring it's fully coated by the marinade. Cover and allow to marinate in the fridge for an absolute minimum of 4 hours, but the longer the better (up to 24hours). Remove at least 30mins before you intend to use it to bring to room temp (important – frying cold chicken causes it to seize up and go chewy).
- Meanwhile, combine all of your dry mix. I find this easiest in a small tray, but you can also use a shallow bowl. Dip a piece of your chicken into the mix and fully coat. Really make sure you get the mix in every part of the chicken, this will give you those 'flaky' parts which make the chicken extra crispy. The more craggy/flaky the chicken is the crunchier it'll be. Place on a wire rack and repeat with the remaining chicken.
- Heat up enough oil to comfortably cover the depth of your largest piece of chicken. Drop a piece of mixture in, if it slowly sizzles to the top you're good to go. You want the oil to be approx 175C/350F – 180C/356F. The temp will drop when the chicken hits the oil, and that's okay, just try to maintain a heat of around 320F/160C. A medium heat should obtain this.
- In batches of 3 (4 max) gently place your chicken in the oil, making sure you add the same cuts at the same time so they cook at an even rate (thighs, drums, wings). Deep fry for 5-8mins on each side, or until deep golden and white through the centre (see notes). Don't move the chicken for the first couple of mins, you need the batter to attach to the chicken. Timings will be completely dependent on the size of the chicken pieces, how many there are and heat retention, so just be vigilant. Bring heat back to 175C/350F – 180C/356F between each batch.
- Place each piece on a wire rack with paper towels underneath when finished and sprinkle with salt to draw out the last bit of moisture and bring out the seasoning. The chicken should be piping hot with the juices running clear. In all circumstances the chicken internal temp 165F/75C (take into consideration it continues cooking slightly once out the oil).
Video
Notes
Your Private Notes:
Nutrition
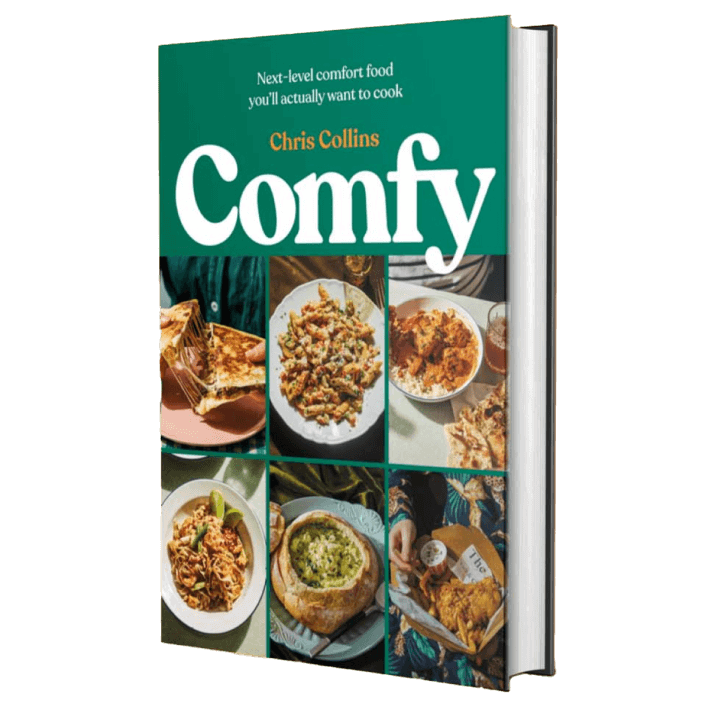
Looking for more?
You’ll find plenty more delicious comfort food like this in my Debut Cookbook ‘Comfy’
If you’re looking for more fried chicken recipes then check these beauties out too:
Delicious Fried Chicken Recipes
- Crispy Chicken Wraps
- Popcorn Chicken
- Spicy Chicken Tenders (or Nashville Chicken Tenders)
- Crispy Chicken Burger
- Shallow Fried Chicken


Followed the recipe perfectly and used a digital thermometer when frying my chicken in frying pan and the crust was amazing but when we sat down to eat the chicken was raw. I put the thermometer in different places away from the bone don’t understand why it was not cooked. I had to put back in pan to cook longer and this made the crust soggy. Any advice? Will absolutely try again as the crust was perfect.
Sorry to hear this happened, but great to hear you enjoyed the crust and will try again! If the thermometer definitely read that the chicken was cooked, my thought is that the thermometer may not have been placed efficiently in the thickest part of the meat, which is likely why it was undercooked. In general, the batter being cooked perfectly and the meat being raw just means the oil wasn’t hitting the right temp for as long as it needed (in this case slightly too high). Just make sure it’s a steady 160C throughout frying, and if it creeps lower or higher just adjust the heat to maintain a cooking speed in which the meat cooks at the same rate as the meat. Did you remove the chicken from the fridge at least 30 mins before dredging and cooking? Frying cold chicken will definitely take longer than room temp (or close to room temp) chicken. Working in batches is also important. To be extra safe next time, you could try smaller cuts (wings, small drumsticks etc). Hope this is hopeful for the next go! C.
Thanks Chris, appreciate the advice. Will try again! 🙂
What type of salt is used in this recipe table salt or kosher salt. Thanks.
Hey Mark! I use table salt in all my recipes 🙂 C.
I have not tried the fried chicken recipe yet but plan to on Mothers Day 2024. My daughter loves my fried chicken, just want to try something different. I’m disabled and will be 71 June 29th. I have a seriously bad heart, hope I’m above ground a few more years.
Ummm we just made this today for family. Deep fried in our yard. And…..it was so freaken good!!!!!! So goooood! Everyone loved everything. Saving this recipe to make again for sure.
So pleased to hear, Rosario!! 🙂 C.
I am always looking for ways to use up my buttermilk after making my own butter. So when I came across this recipe I was really excited to try it, and oh wow! I immediately fell in love with it. I was eating while I was still cooking batches.
I didn’t even follow the whole recipe the first time, I just chucked the chicken in the buttermilk and popped it in the fridge for the next night. It wasn’t until I read through this recipe that I realised I was meant to add spices to the buttermilk. Lol.
I cut up 2 chicken breasts into smallish pieces and shallow fried them.
I had half the batch fresh that night for tea, then chilled the other half.
The 2nd batch reheated beautifully in the oven the next night. I think it only worked because they were small pieces, so reheated easily without drying out.
I am going to make it again this weekend this time following the recipe properly (but still shallow frying, I don’t deep fry).
This is definitely going to be a regular meal for me now.
Love the name of your website, but I can’t get the tune out of my brain now dammit. Lol.
Debbie, so pleased to hear this went down well! Thanks so much for the thorough review 🙂 C.
I made this for Easter dinner, deep fried in my oil fryer, about 15 minutes at 350F. It turned out fantastic!! Love the flavors and the little bit of kick from the cayenne. 5 stars for sure!
Even better, I used the remaining wet and dry mix to season a head of cauliflower, cut into bite sized pieces, then deep fried at 350 for about 5 minutes, SO DELICIOUS!!!!
Thanks so much for the review, Jarah! Love the idea of using cauliflower too. C.
Had to leave a review because this recipe is fantastic! I read all the reviews before making it and I saw one bad review, so I learned from that persons’ mistakes and made sure to let the chicken come to room temp before breading and then after breading I let them rest for a little bit to glue the breading to the chicken. They were perfect! Better than restaurant quality! I used boneless chicken breasts and cut them into tenders and nuggets and I also followed the exact same recipe and technique with cauliflower florets to make cauliflower nuggets! It worked perfectly and they were amazing. 11/10 ⭐️ will definitely make again.
So glad this was a success for you, Robin! Thanks so much for popping back and leaving a review 🙂 C.
I followed your lead and made cauliflower nuggets. OMG they were FANTASTIC! Even better than the chicken, lol