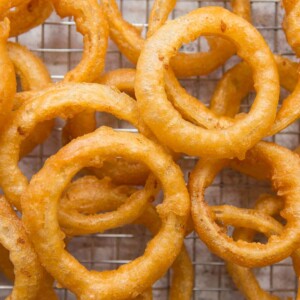
Making your own Beer Battered Onion Rings truly couldn’t be easier. Here I’ll show you some tips and tricks to getting teeth-shatteringly crispy Onion Rings!
If you’re looking for the most delicious homemade onion rings which are truly crispy and bursting with flavour, you’ve come to the right place. Follow me…

Homemade Onion Rings
All great onion rings start with the perfect onion. Here’s what you’re looking for:
- Variety – You want to get yourself a white/brown onion. You can use red onions, but their slightly higher sugar content makes them more prone to burning.
- Size – The bigger the better. If you can, you want an onion that weighs around 10.5oz/300g. You also want to try and get a very spherical onion too.
- Slices – The perfect onion ring is sliced to 1/2″. Use all of the slices apart from the very small ones, or ones that tear.
From there, we want to coat the rings first in a flour mix, and then into the infamous beer batter. By doing this you’re going to create tiny air bubbles in the batter, which in turn is what makes the batter so crispy.

Beer Battered Onion Rings
The initial flour mix is what helps the beer batter stick to the onion. For flavour, I add salt, white pepper (adds a little more heat than black pepper) and paprika. Nothing OTT, but makes the world of difference. I also add a tsp of baking powder in all my batters. This is what helps create those tiny air bubbles we were just talking about.
Tips for the perfect Beer Batter
- Cold Beer – using cold beer causes more of a reaction when the batter hits the hot oil, which in turn contributes to extra crispiness.
- Don’t over mix – when you whisk the beer into the flour, make sure you don’t beat the heck out of it, or all the bubbles will burst. Whisk until just combined. A few lumps are fine.
- Work quick – The longer the batter rests, the more it will deflate and the more bubbles will pop. You want it as airy and frothy as possible before it hits the oil.
How to prepare onion rings (Quick Summary)
- Slice the tip off a large onion, peel the outer layer, then slice into 1/2″ rings.
- Full coat in a flour mix.
- Line up on a wire rack.
- Pour beer into flour mix.

Deep Fried Onion Rings
100% if you want truly crispy onion rings, it’s deep fried all the way. If you’re not confident with deep frying, onion rings are the perfect introduction. I.e no chance of raw meat, the worst that is going to happen is you’ll end up with a few questionable onion rings. No biggie. There’s tonnes to test.
How to Deep Fry Onion Rings (Quick Summary)
- Coat your onion rings in the beer batter.
- In small batches add to hot oil and fry for around 2-3mins, flipping once.
- Remove from oil, give them a shake, place on wire rack.
I recommend serving after ever 2 batches. The longer you leave the onion rings, the less crispy they’ll be; meaning by the time you’ve finished deep frying the lot, the first batch won’t be as fresh as the last. Just have someone ferry the batches out to guests as you fry 🙂

And after all that you’re going to be staring at some darn good looking onion rings. Before we tuck into the full recipe, why not check out some of my similar recipes?
Finger Food Recipes
- Chorizo Sausage Rolls
- Baked Avocado Fries
- Crispy Oven Baked Fries
- Potato Wedges
- Cheese and Prosciutto Twists
Deep Fried Recipes
- Spicy Chicken Tenders
- Fried Cheese Balls
- Crispy Halloumi Fries
- Buttermilk Fried Chicken
- Bloomin’ Onion

Beer Battered Onion Rings
Equipment
- Sharp Knife & Chopping Board
- 1 large Bowl (for batter)
- Whisk
- 2 Wire Racks
- 1 Large Pot/Deep Pan (for frying)
- Kitchen Tongs
- Paper Towels
Ingredients
- 1 Extra Large Onion (see notes)
- 1 cup / 240ml COLD Beer (see notes)
- 1 cup / 150g Plain Flour
- 1 tsp Paprika
- 1 tsp Baking Powder
- 1/2 tsp Salt, plus extra to serve
- 1/4 tsp White Pepper
- Oil, for deep frying (see notes)
Instructions
- In a large bowl, whisk together flour, baking powder, paprika, salt and white pepper.
- Cut the tip (not the root) off of the onion with a sharp knife. Peel off the brown skin, then carefully make 1/2" slices along the onion. Pop out the rings, discarding any extremely small ones or any that broke.
- Coat the onion slices in the flour a handful at a time, then place on a wire rack with paper towels underneath (to catch excess flour). At this point you can heat a couple of inches of oil in a suitably sized pot/pan to 190C/375F.
- Pour the cold beer into the leftover flour and gently whisk to combine. Don't beat the hell out of it, or you will burst all of the bubbles. Whisk until just combined. A few lumps in the mixture are fine. The consistency should be ever-so-slightly thicker than heavy/double cream. You can adjust slightly with beer/flour if needed.
- Grab a handful of the onion rings and submerge them into the batter. One by one, pluck 4-5 of them out and carefully add to the hot oil, separating any that instantly stick. Allow to fry for 2-3mins, flipping once, or until golden and visibly crisp. Remove and place on your first wire rack with paper towels underneath. Repeat with remaining onion rings. Try to work quickly (but also safely) so the batter stays as cold as possible.
- Sprinkle/ toss the onion rings with salt then serve and enjoy!
Video
Notes
Your Private Notes:
Nutrition
Looking for more?
You’ll find plenty more delicious comfort food like this in my Debut Cookbook ‘Comfy’


Love, love, love the recipe. Turned out absolutely perfect. Used it for mushrooms too and they were divine too. How do you keep doing it Chris? Recipe after recipe are amazing and delivers what I’m expecting. Please don’t sell yourself out to these bloody subscription channels. Not all of us can afford the extras. Love ya Chris xx
Ahh thank you for such a lovely comment! Really appreciate the kind words and review. I’ll have to try it with mushrooms myself! Cheers 🙂 C.
these onions were super yummy! the paprika taste was wonderful thank you!
Thanks for review, Amanda! C.
Can these be cooked and reheated to save time.
Unfortunately I don’t recommend making these ahead of time. C.
Have you ever frozen these ?
I haven’t unfortunately Katie! You could certainly try it with any leftovers and see how you get on. C.
Great Recipe and beautifully written and explained.
Thanks Mike! 🙂 C.
Lovely recipe. Thank you.
We can’t believe how amazing these onion rings turned out. Just follow the recipe and cooking tips and you can’t go wrong.
Great to hear they turned out well, Matt! Thanks for popping back for a review 🙂 C.
These looks so great, can’t wait to try! I wish you put which sauce you used or the recipe for it though cause it looks like it pairs perfectly!
The sauce is sriracha mayo, it’s linked in the recipe notes. Enjoy the recipe! 🙂