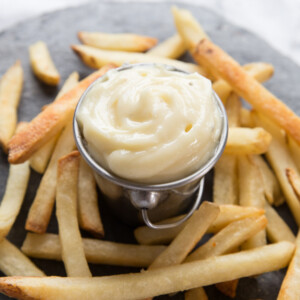
Homemade Aioli couldn’t be more simple to make and this roasted garlic version is no exception. Prepare to never get store bought aioli again!
No but seriously, when I say this is the best aioli recipe you’ll ever taste, I truly mean it. Smooth and creamy with a gorgeous sweet punch from the roasted garlic. Forget the fries, I’d dunk my face into that bowl/already have/prob do it again.

Aioli
First things first, let’s blow away some aioli cobwebs that might be lurking around…
What is Aioli?
Aioli is a Mediterranean dip traditionally made by forming an emulsion of garlic and olive oil.
What is the difference between Mayo and Aioli?
Traditionally Aioli is made up purely of crushed garlic, olive oil and salt. Mayonnaise is absent of garlic and often uses an emulsifier such as egg yolk. It also commonly includes ingredients such as dijon mustard, lemon juice and white pepper.
The modern-day Aioli
In recent times Aioli has dispersed into many different forms and is more commonly just sold as garlic or flavoured variety of mayonnaise.
You’re more confused than before right!? Okay good. Pass the french fries and let’s continue.

Roasted Garlic Aioli
Now, whether it’s garlic mayo or aioli, typically you would use raw garlic. However, I do find sometimes raw garlic can be a little harsh. It kind of limits what you can pair the sauce with without it completely overpowering the dish. So, to counteract that we’re going to roast the garlic.
Why roast the garlic?
By roasting the garlic you caramelize it and turn it sweet and nutty. It also completely softens the garlic, meaning it blends into the aioli much easier. By roasting the garlic you get the awesome garlic flavour, without the pungency and gritty texture.
Process shots: add bulb of garlic to chopping board (photo 1), slice off tip to expose cloves (photo 2), add to foil (photo 3), drizzle with oil (photo 4), tightly wrap (photo 5), roast until soft, golden and caramelized (photo 6).

Making Aioli
I have actually made a traditional aioli before, just good old olive oil and salt. But for me, it was just way too bitter. I am all for keeping things classic, but I’m even more for putting a modern twist on things if it enhances the flavour. Aioli traditionalists look away…
Garlic Aioli Ingredients
- Garlic – As discussed.
- Oil – I prefer a neutral flavoured oil like sunflower/vegetable oil
- Egg Yolk – Helps bind everything together.
- Lemon Juice – Cuts through the richness of the sauce.
- White Wine Vinegar – Same as above, just adds a slightly different flavour dynamic. Can sub more lemon juice.
- Dijon Mustard – Adds a gentle background flavour.
- Salt – For seasoning and to smooth out the roast garlic.
When it comes to making Aioli, it’s all about creating an emulsion. An emulsion is essentially the result of mixing two liquids that are not soluble. For example, if you poured balsamic vinegar into a glass of oil, they separate and stay that way. An emulsion would be if the two mixed.
In the context of Aioli, it is when you crush garlic cloves into liquid form and slowly introduce oil to create a creamy sauce. Here I also add an egg yolk to help things along.
Tips for making the best Aioli
- Slowly & Steady – it is so so so important to start introducing the oil into the yolk as slowly as possible. Start drip by drip and slowly start creating a stream.
- Salt & Garlic – Whether you roast the garlic or start with it raw, make sure you crush it with salt to create a smooth paste. This will result in a lump-free aioli and make it easier to start the emulsification process.
- Water & Lemon Juice – Adding more oil will actually thicken the aioli further, so if you’re looking to thin it back out have some lemon juice and a tbsp of water at the ready to do so.
Process shots: mash together roasted garlic and salt (photo 1), add egg yolk, mustard, vinegar and lemon juice (photo 2), whisk to combine (photo 3), add folded towel or cloth underneath bowl (photo 4), gradually whisk in oil until thick and creamy (photos 5&6).

Serving Aioli
Once complete, serve up right away or tightly store in the fridge until needed! I find it lasts 3-5days tightly stored in the fridge, longer at your discretion. I love slathering this on sandwiches or using it as Dip for things such as Fries, Wedges and Pizza!
Alrighty, let’s tuck into the full recipe for this roasted garlic aioli shall we?!

How to make Roasted Garlic Aioli (Full Recipe & Video)
Roasted Garlic Aioli
Equipment
- Sharp Knife & Chopping Board
- Small Mixing Bowl
- Cloth or Tea Towel
- Whisk
- Jug
- Foil
Ingredients
- 1 small bulb of Garlic
- 1 cup / 250ml Oil (see notes)
- 1 large fresh Egg Yolk
- 1 tsp Dijon Mustard
- 1/2 tsp Lemon Juice
- 1/2 tsp White Wine Vinegar (or sub more lemon juice)
- Salt to taste
Instructions
- Slice the tip off the bulb of garlic, exposing the cloves. Drizzle with a little oil, wrap foil and pop in the oven at 180C/350F for 45-60mins, or until deep golden and completely soft throughout.
- Squeeze out the garlic into a small mixing bowl with a good pinch of salt. Use a whisk or mash with a fork to smooth out any lumps. Allow to cool.
- Add in the egg yolk, alongside vinegar, lemon juice and mustard. Whisk until smooth.
- Grab a towel and fold it into a circle (see video). Place your bowl on top - this will stabilise the bowl and allow you to whisk/pour at the same time.
- Drip by drip, begin pouring in your oil, ensuring you continually whisk. It's essential you start with tiny amounts to keep it from splitting. Ensure you whisk very vigorously throughout the whole process.
- Very gradually increase to a gentle stream and keep whisking until your desired texture. Around 3/4 - 1 cup should hit the spot.
Video
Notes
Your Private Notes:
Nutrition
Looking for more?
You’ll find plenty more delicious comfort food like this in my Debut Cookbook ‘Comfy’
If you loved this Aioli Recipe then be sure to Pin it for later! Already made it or got a burning question? Give me a shout in the comments below and pick up your free ecookbook along the way!


Have you tried this with using truffle oil? if so, how much would you recommend? Thank you!
Truffle oil might be a little strong, especially alongside the garlic. I’d use mostly neutral flavoured oil until the aioli has nearly formed, then add in the truffle oil a small drizzle at a time until the aioli has formed/it gives you enough flavour. Much easier to add in more than take it out!
Using raw egg yolk, is there any issues with salamonili?
The risks of using raw eggs are low, but there is a very slightly heightened risk of them carrying Salmonella. My instinct is also that the acidity from the lemon juice and slight friction from the whisk ever-so-slightly ‘cook’ the egg as well, lowering the risk even more. However, it is ultimately a personal choice. If you if you are at all concerned then I recommend using pasteurized eggs. Also get as fresh eggs as possible and use right away or store correctly.
Hi! How long does it last in the fridge? I made mayo once and it didn’t last more than a couple of days . It started smelling funny… thanks
Hi Gaby! It’s difficult to say because of the raw egg.. In theory the lemon juice & salt should keep it until the use-by-date of the egg. Personally I’ve never had a problem with it before a week, but please use your own discretion! 🙂
Love how easy this is to make at home! Such a creamy and delicious aioli! Definitely a must make!
it’s so easy right!? You gotta try it 🙂
I haven’t ever made my own aioli – yours looks so darn creamy – I’m printing it to try soon! Thank you!
Oh awesome! Enjoy!!
This sounds great. I want to put this on a hot roast beef sandwich. Yum.
Omg now all I can think about is a hot roast beef sandwich!!
You can’t go wrong with a good garlic aioli. It’s fab with so many things, but of course fries! Will have to give your recipe a try.
Thanks Lisa! Enjoy 🙂
I loooooove aioli….every single variety lol. I haven’t tried making it using egg myself, but will definitely give this a try!
Isn’t aioli just the freaking best!?