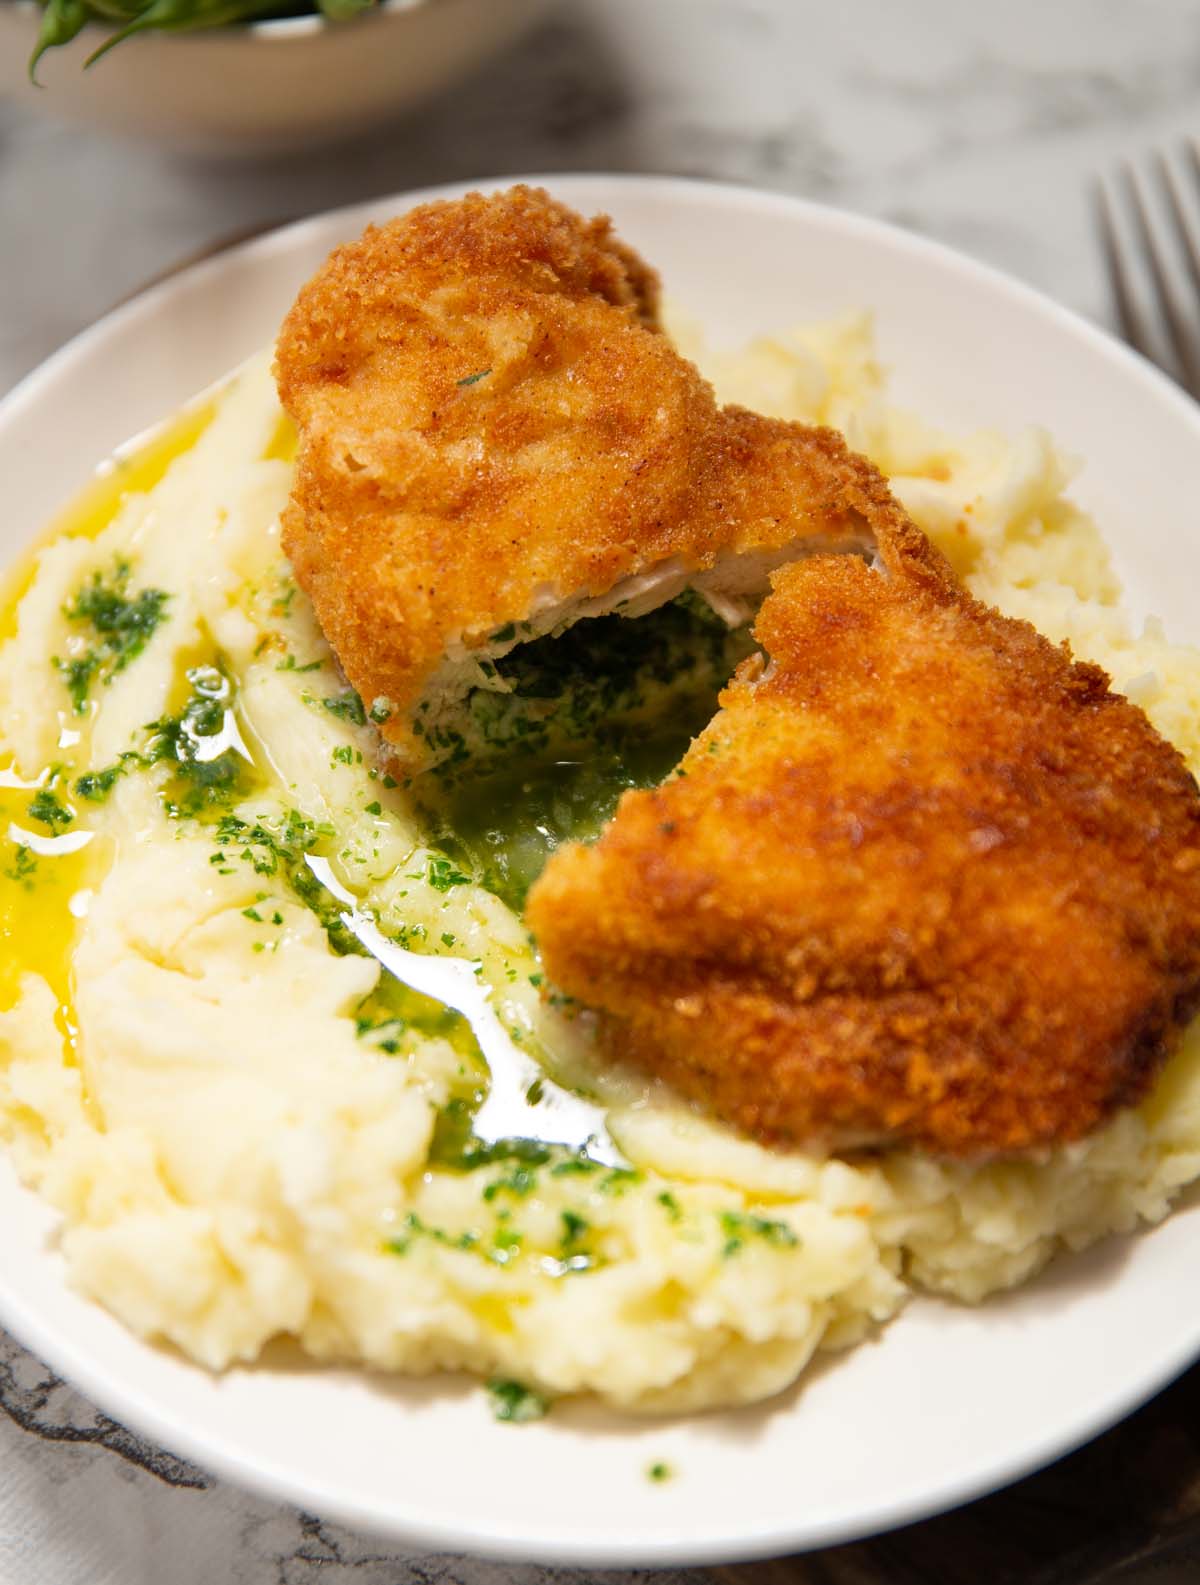
Here I’ll show you how to make a Chicken Kyiv that’s super crispy on the outside with so much garlic butter pouring out of the centre!
There have been too many times in my life when I’ve sliced into a Chicken Kyiv, only to realise all the garlic butter had already leaked out. As such, I made it my mission to create a Kyiv that is so full of garlic butter it’ll make you weak at the knees. I’ve formed a technique for creating the most incredible Chicken Kyiv, and I can’t wait to share it with you! Follow me…
Chicken Kyiv Ingredients
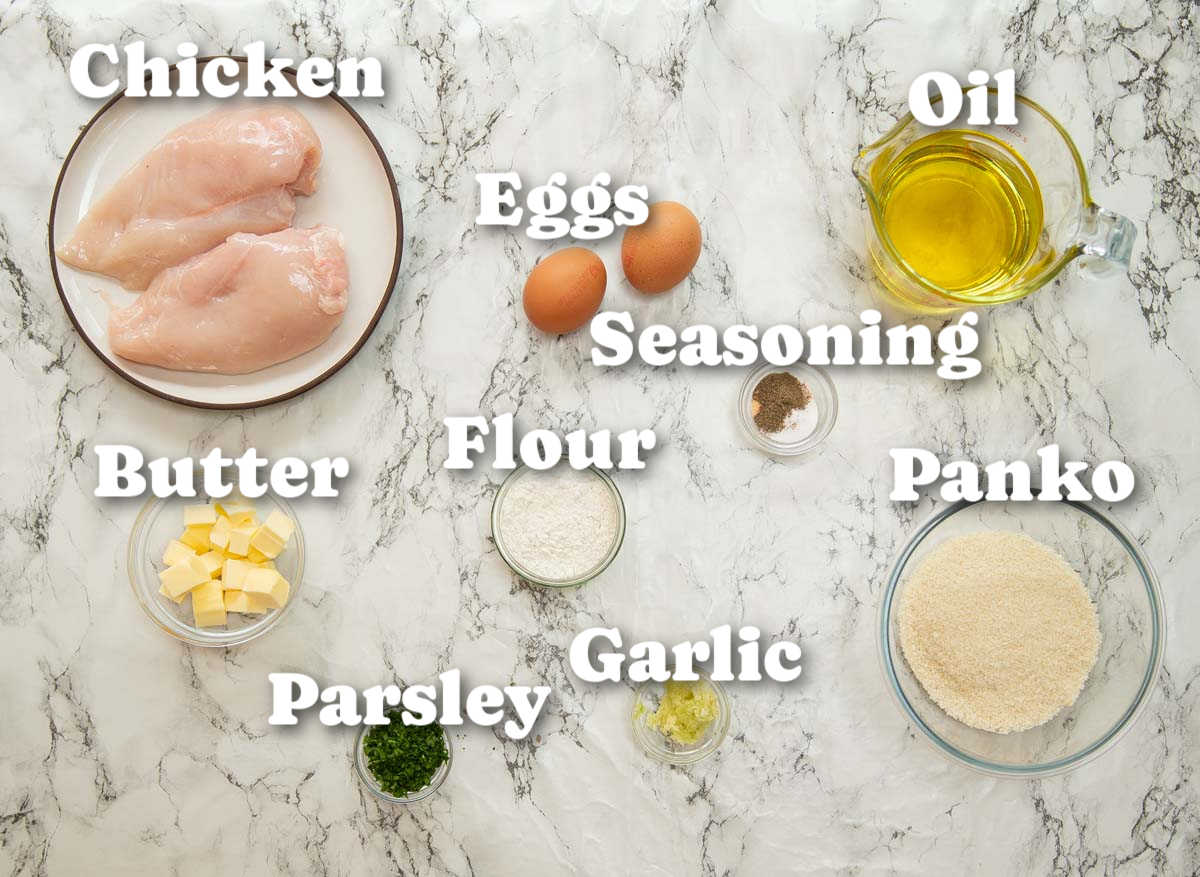
You really don’t need many ingredients to make a Chicken Kyiv, and thankfully, you’ll find them all at the supermarket. Here’s why we’re using each ingredient:
- Chicken – chicken breasts make the perfect ‘pocket’ to contain the filling.
- Flour – the chicken will first be coated in flour to create the first layer of the crispy batter.
- Egg – beaten eggs will bind with the flour to help the breadcrumbs attach.
- Panko – Panko breadcrumbs are used for the outside layer to make the Kyivs extra crispy.
- Seasoning – I season the flour and breadcrumbs with some paprika, onion powder and salt & black pepper.
- Oil – this is used to shallow fry the chicken before it is baked. Make sure you’re using an oil with a high smoking point like vegetable or sunflower oil.
- Butter – make sure it’s firm enough to hold its shape, but soft enough to mix with the other ingredients.
- Garlic – make sure you’re using fresh garlic. Powder or the jarred stuff will throw off the flavour. I recommend finely grating it and using your knife to mash it into a paste, just so you don’t get large bits of garlic floating around.
- Parsley – a classic addition in garlic butter.
Did you know?
Panko are great because they’re big and airy, meaning they crisp up really efficiently. You’ll find them in pretty much all supermarkets in the Asian section!
Chicken Kyiv Filling
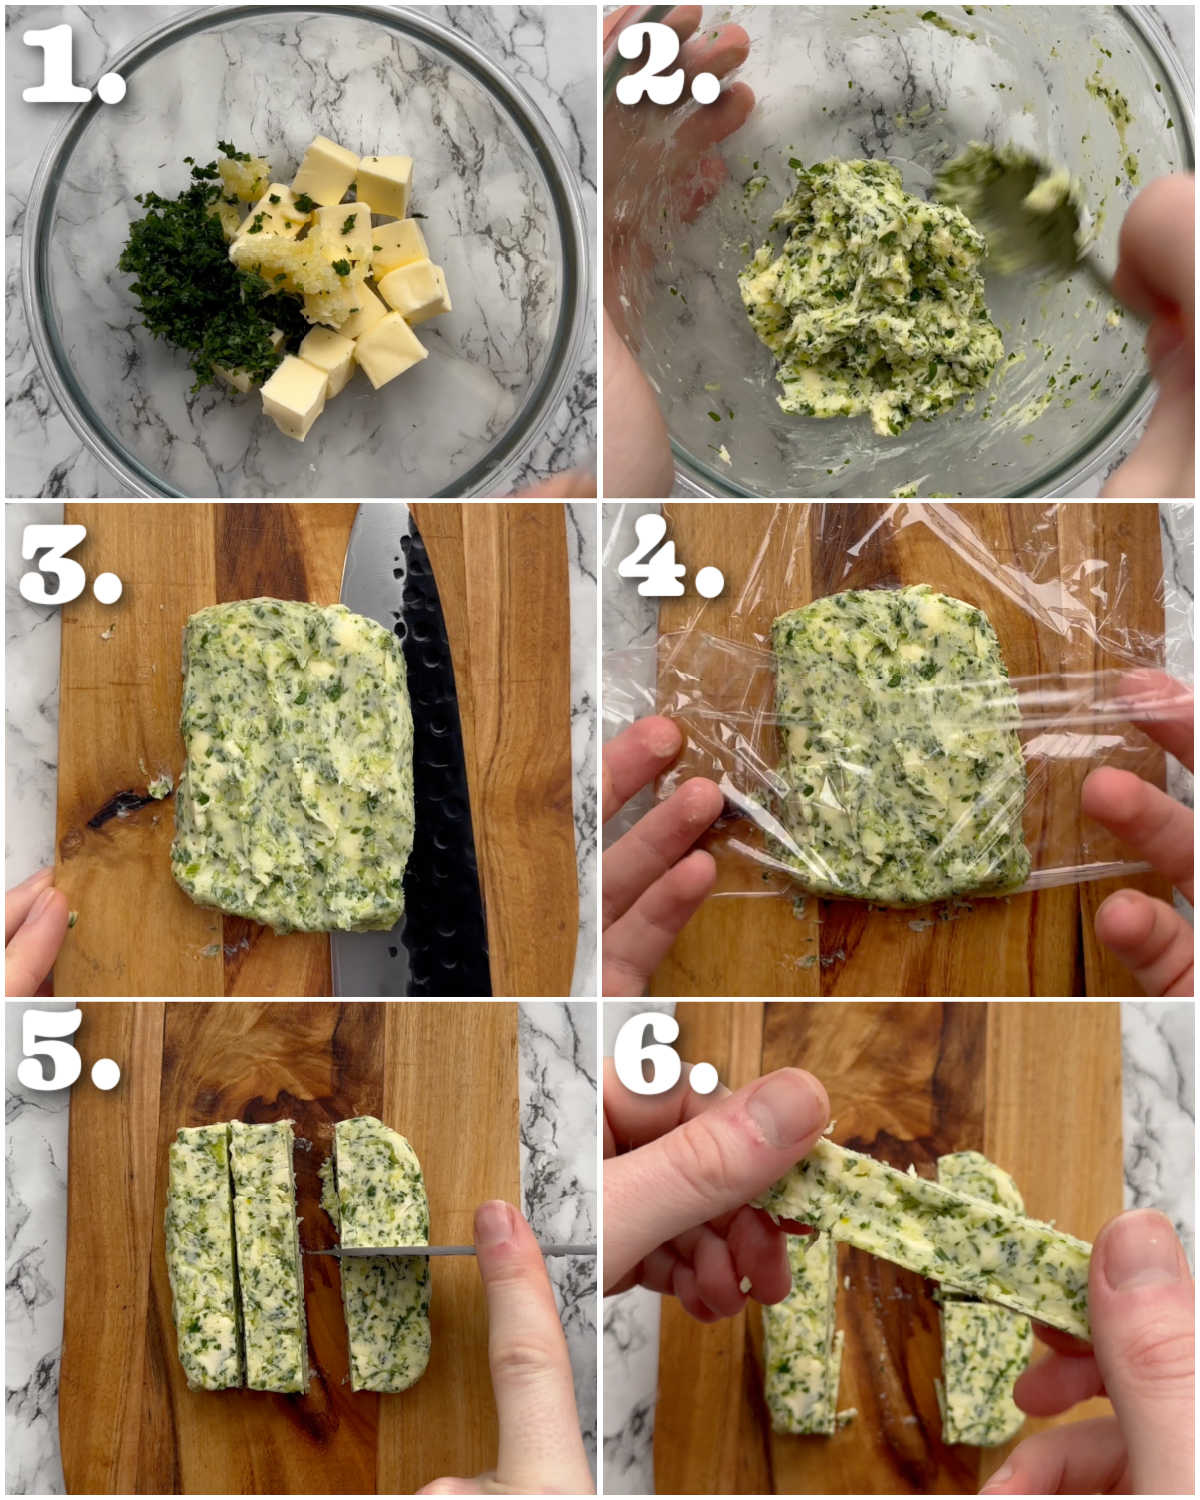
Making the garlic butter is as simple as combining the garlic, butter and parsley. From there, we’re actually going to mould it into a slab and freeze it. Freezing the filling serves two purposes:
- Shape – freezing the butter means you can slice it into segments that will perfectly slot into the chicken.
- Head start – I originally tested this by piping the butter into the chicken. However, because the butter is already practically melted, I found it was much more prone to seeping out of the chicken as it cooks. Freezing it means the chicken gets a head start in cooking, before the butter begins to melt and tries to make its way out of the chicken.
Process shots: add ingredients to bowl (photo 1), combine (photo 2), form a rectangle (photo 3), wrap in cling film and freeze (photo 4), slice into batons (photos 5&6).
Slicing the chicken
Here’s what other recipes do:
A lot of recipes suggest slicing the breast right down the side and opening it up to make room for the butter. I tried this, and every single time the butter leaked out. The gap is WAY too big and the butter will always find its way out.
Other recipes suggest slicing the breast open, pounding it thin, adding the butter in the centre and wrapping it up like a parcel. This actually works pretty well, but it means you have to freeze the chicken AND deep fry it. It’s also very risky, because if the chicken isn’t wrapped properly it’ll unfold in the oil (yes, nightmare).
Here’s what I do and why it works:
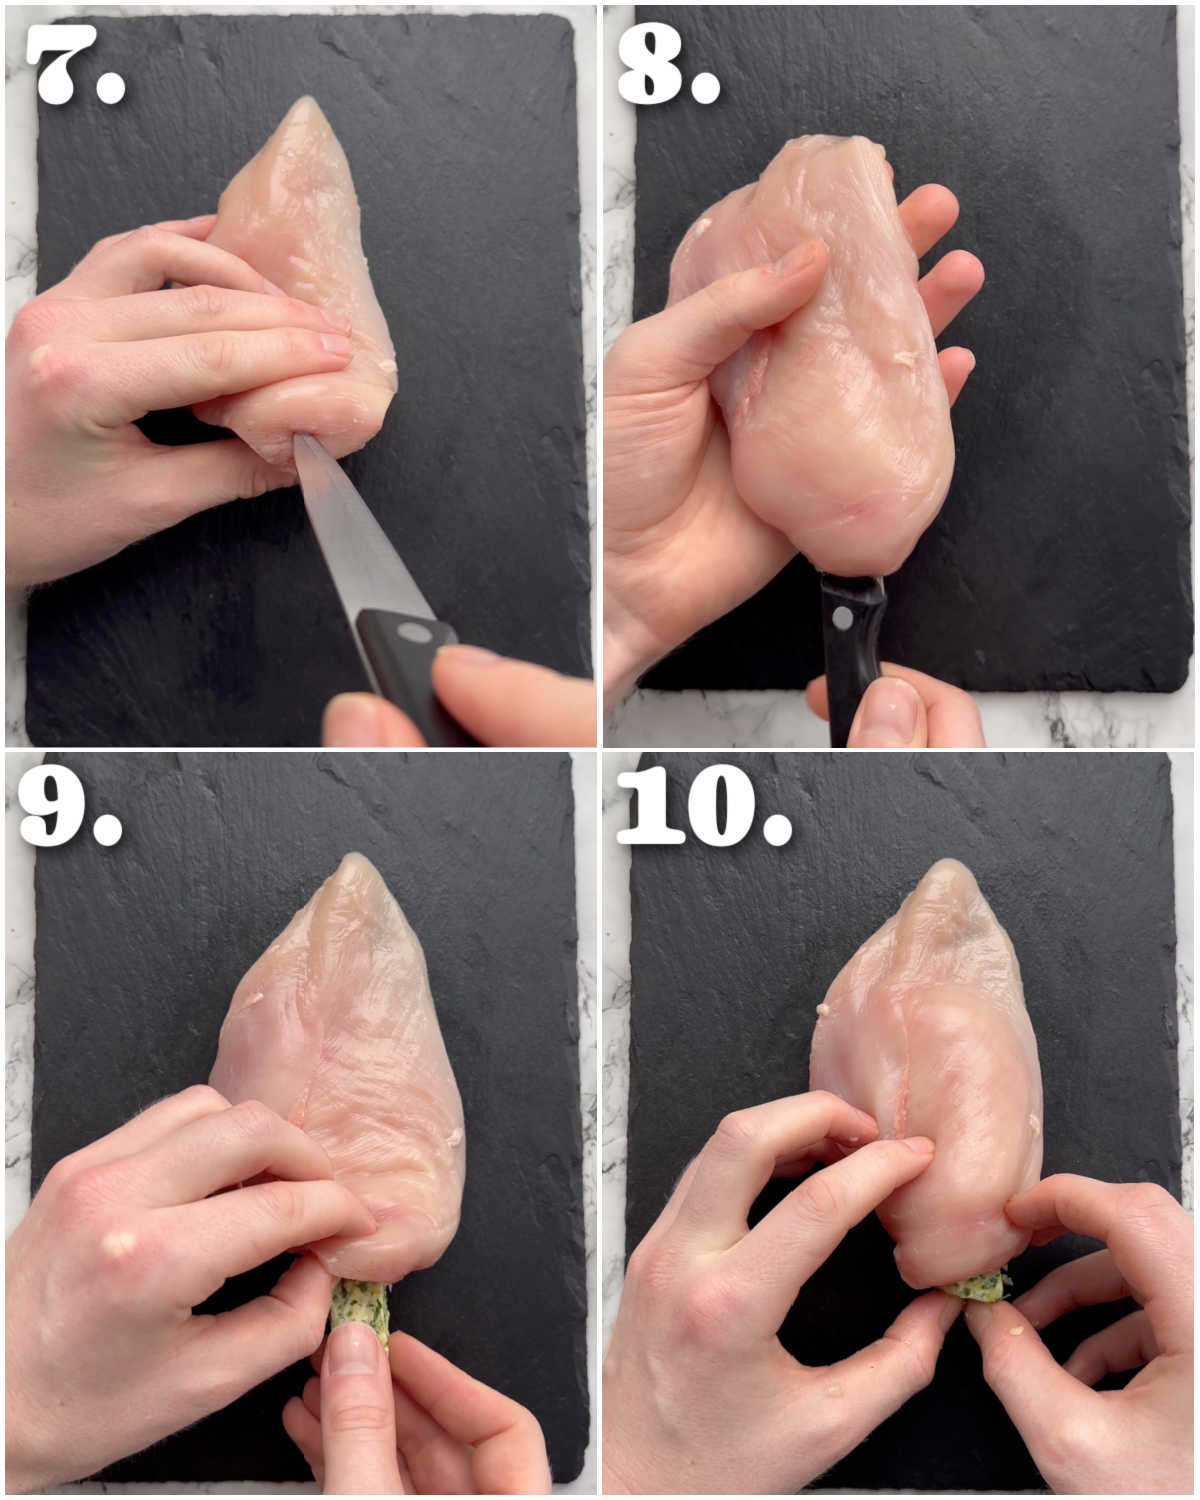
The aim of the game is to get as much butter in the centre, with as little gap as possible. As such, I take a small, sharp knife and make a tunnel through the breast. From there, you can use the knife to make as much room in the centre of the breast and then slot in the frozen strips of butter.
Process shots: slice through the breast to make a tunnel (photos 7&8), slot in the butter (photo 9&10).
Recipe Tip
To close the small gap, just slice off some stray meat and plug it in and seal the gap. If you do slice through the chicken, you can do the same thing to cover up the gap and prevent the butter escaping.
How to cook Chicken Kyiv
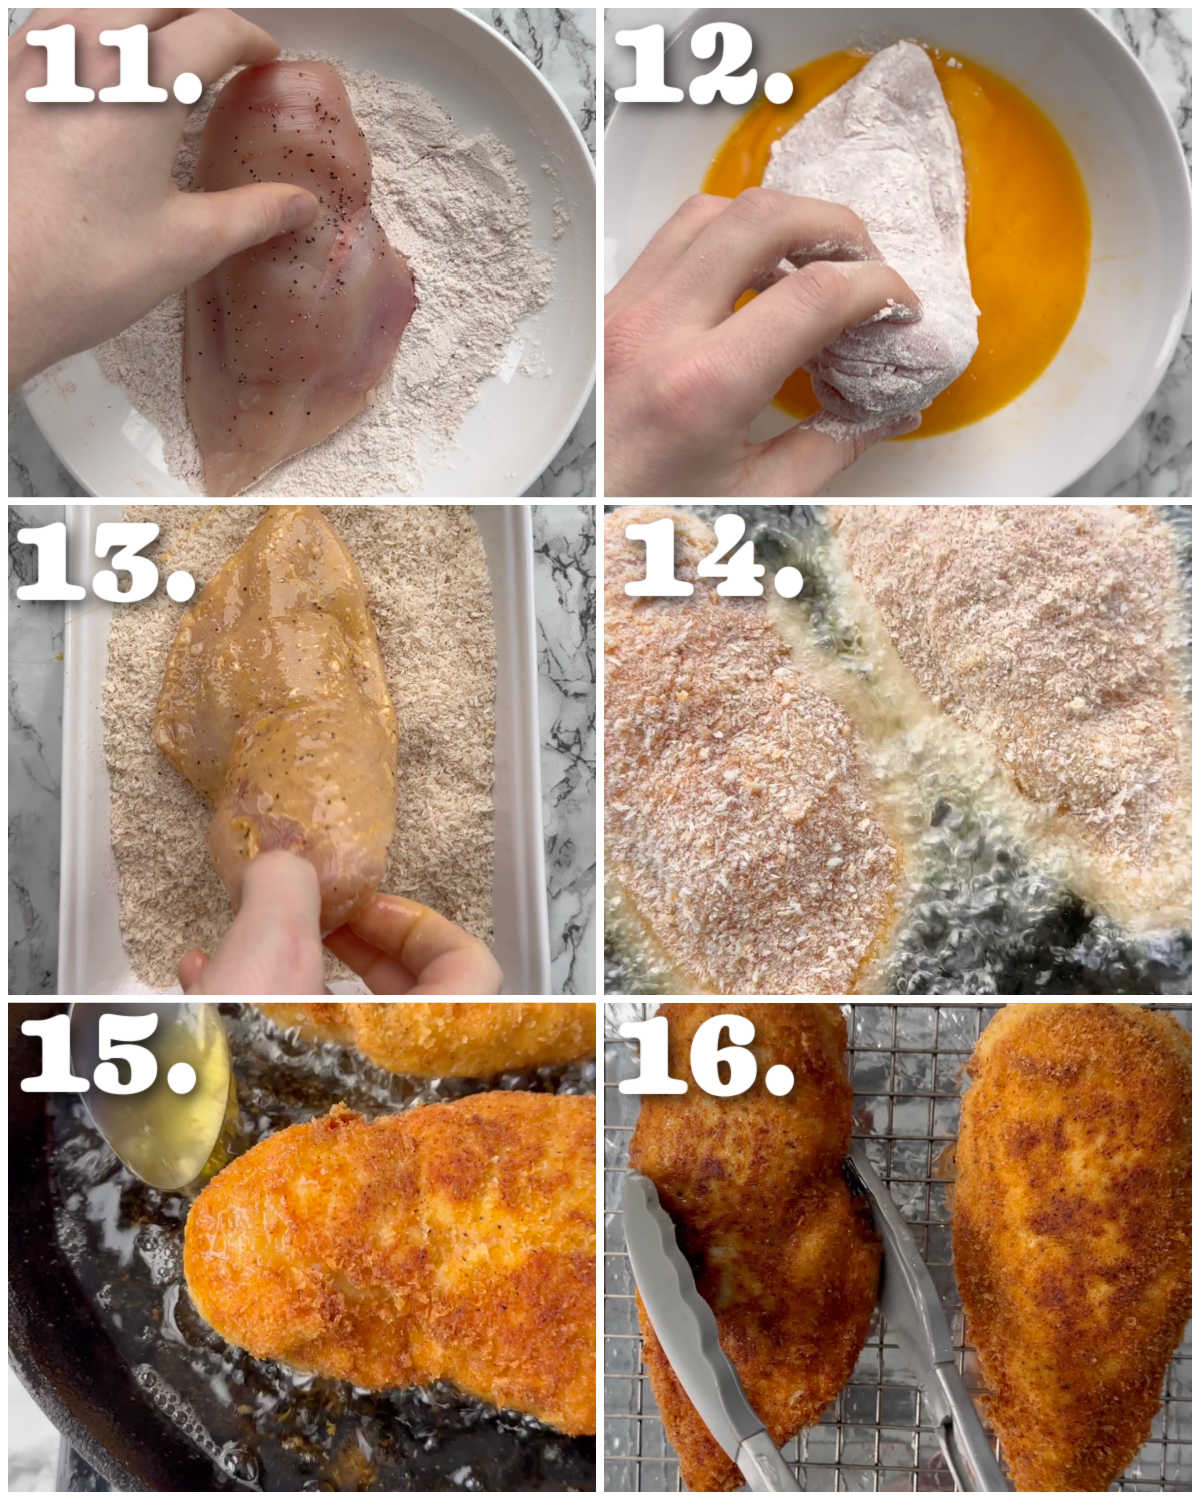
Once you’ve stuffed the chicken, you simply need to coat it in flour, egg and Panko. From there, the cooking takes place in two stages:
- Fry – frying the chicken is crucial for maximum crispiness. You only have to shallow fry, so it’s not too much faff.
- Bake – you won’t be able to cook the chicken the whole way through in the oil without the outside burning. As such, you’ll finish the Kyiv off in the oven.
I like to put the chicken on a wire rack above a foil-lined tray to bake. Not only does this help the hot air circulate around the chicken, but the tray also catches any butter that sneaks out.
Process shots: coat chicken in flour (photo 11), then egg (photo 12), then Panko (photo 13), add to hot oil (photo 14), fry both sides (photo 15), bake (photo 16).
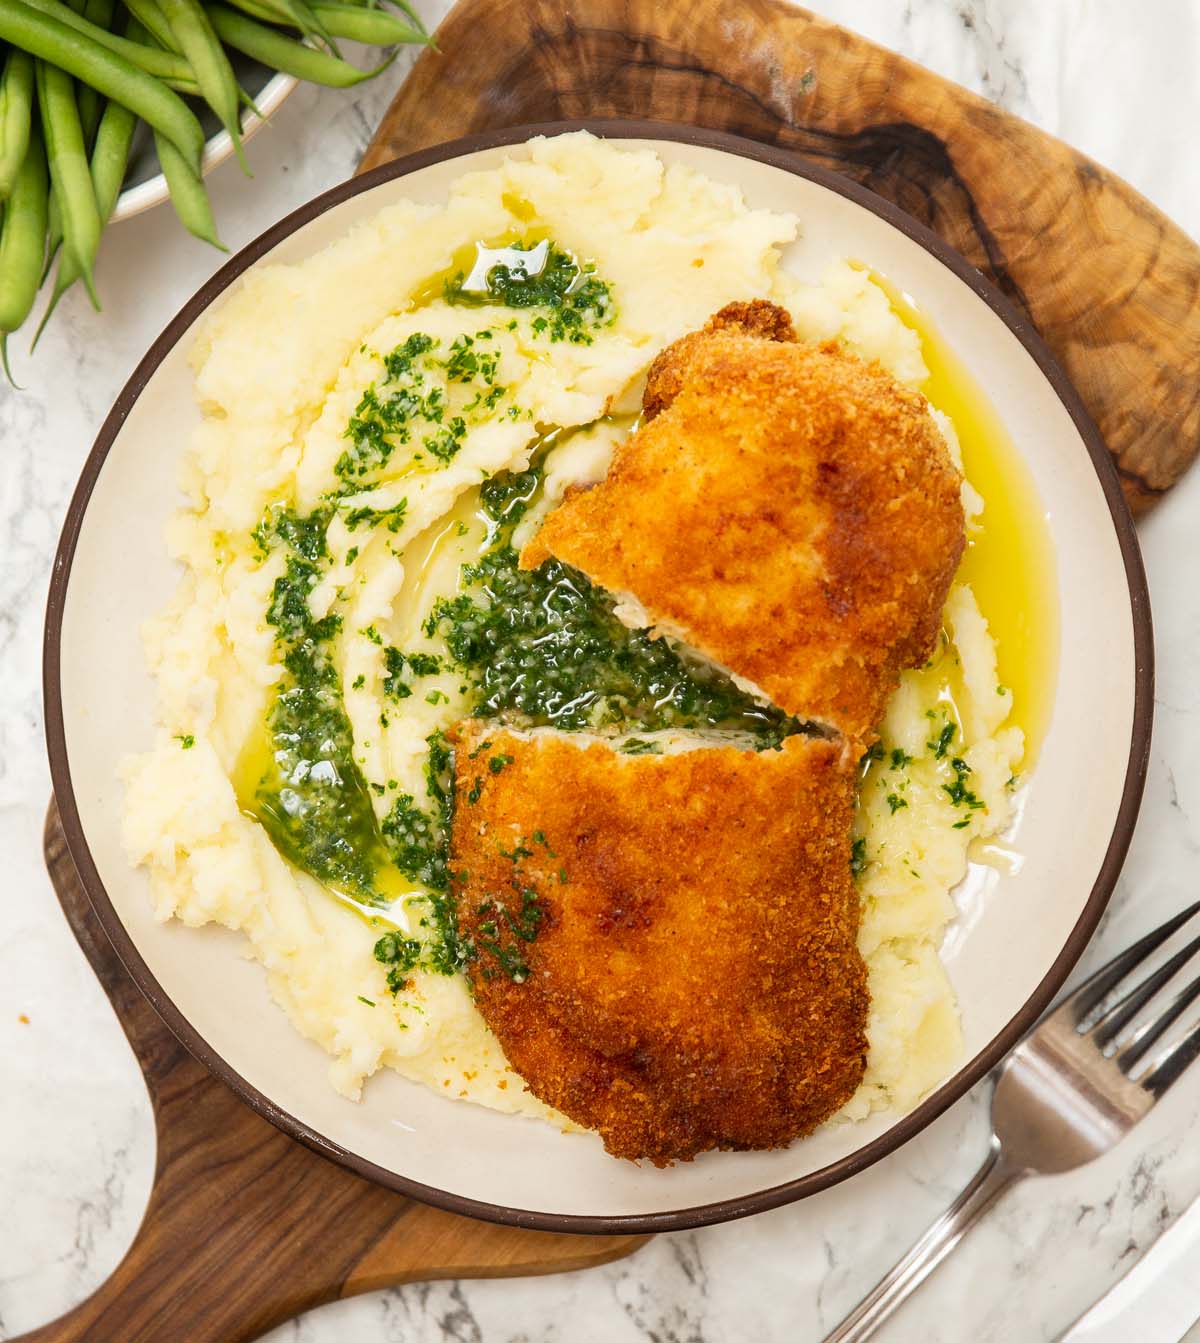
How to serve Chicken Kyiv
Once the Kyiv is out of the oven, you’ll likely notice a little oil in the tray. This will most likely be excess from when you fried it, but it may be butter too. If there’s a lot, don’t panic. You can just drizzle it over the chicken at the end – it’s not the end of the world.
From there, here are some options for serving a Kyiv:
- Salad – from a lighter option, serve with a side salad and some crusty bread for mopping up the butter
- Potatoes – my favourite is Mashed Potato, but Roasted Potatoes, Boiled Potatoes, Smashed Potatoes and a Baked Potato all work tremendously!
- Veggies – any sort of roasted veggies work great as a side.
- Rice – perfect for soaking in the garlic butter.
- Greens – some Green Beans or Roasted Broccolini both take on garlic butter nicely.
Alrighty, let’s tuck into the full recipe for this chicken Kyiv shall we?!
How to make Chicken Kyiv (Full Recipe & Video)
Chicken Kyiv
Equipment
- Sharp Knife & Chopping Board
- Small Mixing Bowl (for butter)
- Cling Film (for freezing butter)
- Small Sharp Knife (preferably slightly shorter than the length of the breasts)
- 3 Large Shallow Dishes (for coating chicken)
- Large Heavy-Based/Cast-Iron Pan & Tongs (for frying chicken)
- Large Tray, Foil & Wire Rack (for baking chicken)
Ingredients
Garlic Butter
- 80g / 2.8oz Unsalted Butter, slightly softened (or salted without the 1/4 tsp salt added)
- 3 cloves of Garlic, finely grated then mashed into a paste with the side of your knife
- 1 tbsp very finely diced Fresh Parsley
- 1/4 tsp Salt
Chicken
- 30g / 1oz Plain Flour
- 2 medium Eggs, beaten
- 60g / 1 cup Panko Breadcrumbs
- 2x 250g/9oz Chicken Breasts, taken out the fridge 30 mins before needed (see notes)
- 1/2 tsp EACH: Salt, Paprika, Onion Powder plus more salt as needed
- 1/4 tsp Black Pepper, plus more as needed
- 400ml / 1 3/4 cups Vegetable Oil, or another oil with a high smoking point i.e. sunflower
Instructions
- Garlic Butter: Use a fork or spatula to combine the garlic butter ingredients in a medium mixing bowl. Scrape onto a flat surface and form a 9 x 6cm rectangle (doesn’t have to be exact). Wrap in cling film and place in the freezer until very firm. Depending on how powerful your freezer is this can take anywhere between 30 minutes to 2 hours.
- Recipe Prep: During this time I recommend getting everything ready for the rest of the recipe. Line up three bowls: one with flour, one with the beaten eggs and the last with the breadcrumbs. Combine the salt, paprika, onion powder and black pepper in a small bowl. Mix half into the flour and the other half into the breadcrumbs. Line a large baking tray with tin foil and place a wire rack on top. Fill a large cast-iron or heavy- based frying pan with the oil.
- Slicing: Place the chicken breasts with the thin tail part facing away from you and the thickest end closest to you. Use a small, sharp knife to slice through the middle of the thickest part and very carefully push the knife towards the thin end, making a tunnel through the centre of the chicken. Take your time and be very careful not to slice through the top, bottom or end of the chicken. Any tears or holes will leave room for the butter to leak out. I recommend flipping the chicken a couple of times as you slice through to make sure the knife doesn’t poke outside the chicken.
- Once the knife is in you can gently twist it to make the tunnel as wide as you can. The aim of the game here is to make as much for room for the butter as possible. Season both sides of the breast with a pinch of salt and pepper, then repeat with the second breast.
- Stuffing: Once the butter has frozen, slice it into three long strips, then slice one of the strips in half. Ideally, you’ll slot one of the short strips into the short side of the breast, and the longer one down the centre. However, this isn’t always achievable, so slice and shape the butter in any way you need to carefully slot as much as you can inside the chicken without it tearing. Make sure you leave a small gap at the opening.
- Once the butter is inside, slice off a small piece of stray meat from the edge of the chicken and use it as a plug to cover the opening. This will help prevent the butter from leaking out.
- Coating: Coat the chicken in the flour, then the beaten egg, then the breadcrumbs. Dab the thick end with the seam back into the egg and coat in the breadcrumbs again. Repeat this once more to build up a thick crust to prevent the butter from leaking out.
- Cooking: Preheat the oven to 180°C/350°F. Heat the oil in the pan over a medium heat until it reaches 180°C/350°F. This will take around 10–12 minutes. When it’s hot enough, a breadcrumb should rapidly sizzle when it hits the oil.
- Place the chicken Kyivs in the oil and fry for 2 minutes and 30 seconds. Carefully flip them over and fry the other side for 2 minutes and 30 seconds. Use a spoon to baste any parts of the chicken that aren’t submerged in the oil, namely the end with the seam. Place the chicken on the wire rack set over the foil-lined tray and bake in the oven for 14 minutes.
- Serving: Leave to rest for a minute or so before slicing. Spoon over any butter that leaked out, then serve with an extra pinch of salt if desired.
Video
Notes
Your Private Notes:
Nutrition
Looking for more?
You’ll find plenty more delicious comfort food like this in my Debut Cookbook ‘Comfy’
For more similar recipes check out these beauties:
Garlic Butter Chicken Recipes
- Garlic Parmesan Chicken Tenders
- Garlic Parmesan Chicken Skewers
- Garlic Butter Chicken Breast
- Garlic Butter Chicken Orzo
- Chicken Kyiv Pasta
- Mini Chicken Kyivs