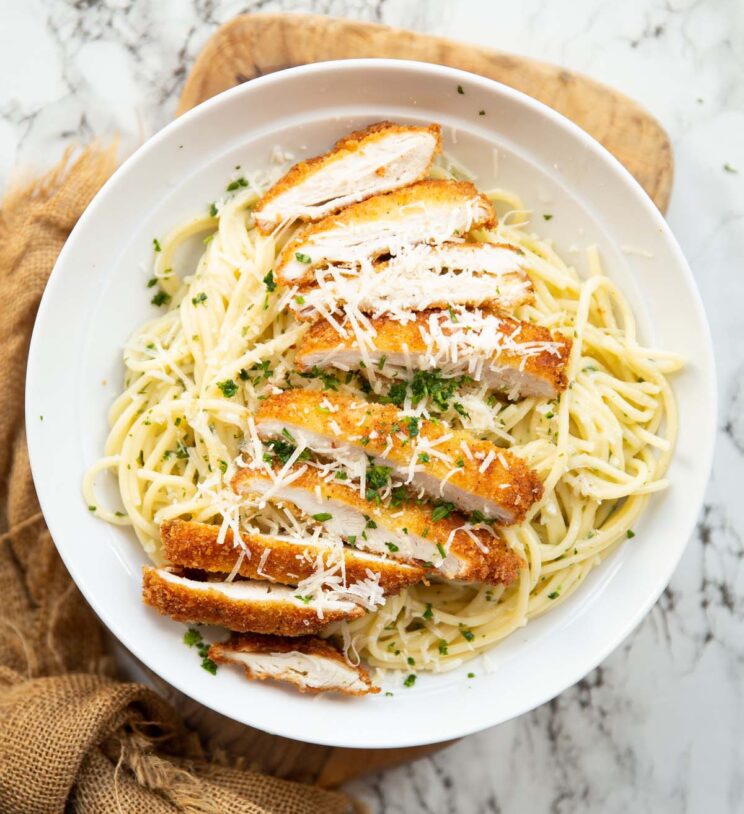
Crispy chicken served on a bed of garlic butter pasta – what’s not to love!?
For me, Chicken Kiev has two key components – the garlic butter and the crispy breaded chicken. Here we’re stirring a simple garlic butter sauce through pasta, then topping it with golden, crisp and juicy sliced chicken. Sound good? Follow me…
Crispy Chicken
I’ve wanted to put out a crispy chicken pasta recipe for quite some time now, and this Chicken Kiev pasta is the perfect excuse. We’ll talk about the garlic butter sauce in just a sec, but first, let’s talk about the chicken.
What cut of chicken to use?
Here we’ll be using boneless, skinless chicken breasts. You could in theory use thighs, but breast is traditionally used in Chicken Kiev because it’s easy to stuff. The main thing is using boneless meat, because chicken bones in pasta are far from ideal! I also recommend slicing the breasts through the centre, just so you end up with 4 even-sized, thinner breasts. This not only means they’ll cook quicker, but they’ll also cook more evenly.
Panko Breadcrumbs
Using Panko breadcrumbs is key to getting the chicken ultra-crispy. Panko breadcrumbs are awesome because they’re big and airy, so they crisp up really well. You’ll find Panko in the Asian section at most supermarkets.
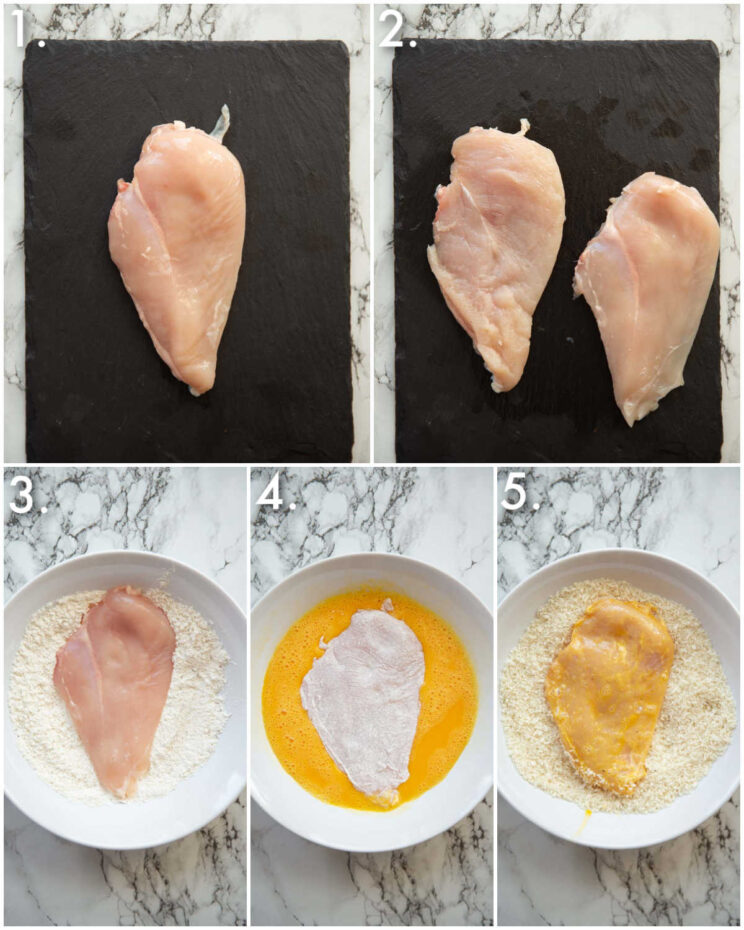
Process shots: add chicken to chopping board (photo 1), slice in half through the centre (photo 2), dredge through seasoned flour (photo 3), then egg (photo 4), then seasoned Panko (photo 5).
Crispy Fried Chicken
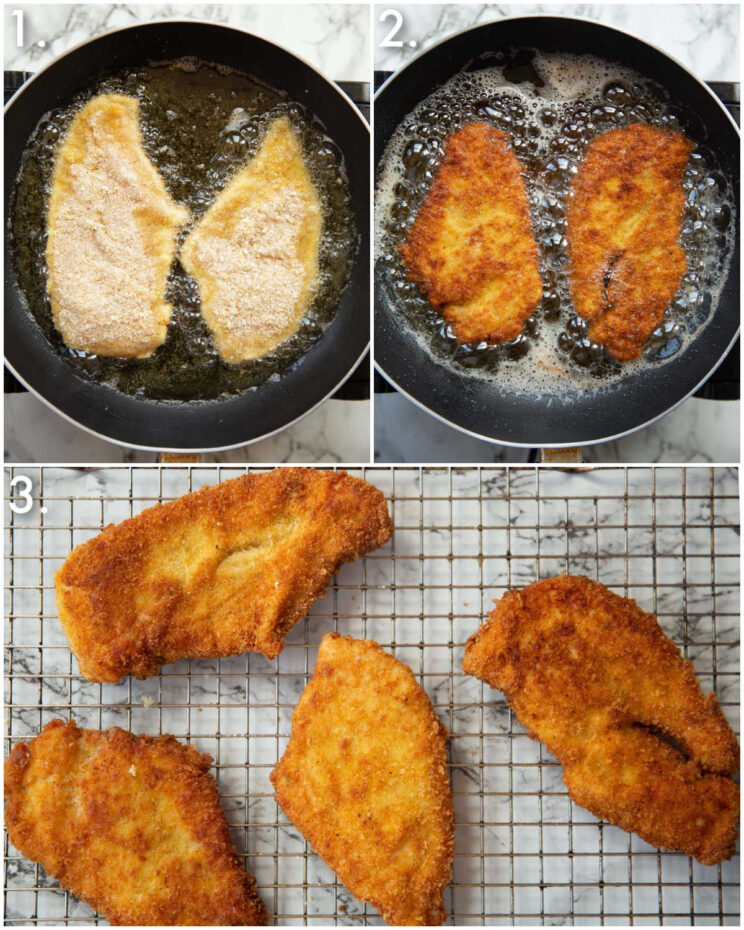
Once you’ve breaded the chicken we’re going to shallow fry it. You don’t need much oil because the chicken will be quite thin; just enough to comfortably cover the base of the pan. Once golden, crispy and cooked through the centre, place on a wire rack to drain off oil and discard the oil from the pan.
Process shots: in batches add chicken to hot oil (photo 1), fry (photo 2), place on wire rack (photo 3).
Garlic Butter Pasta
Alrighty, chicken done and dusted, let’s talk pasta.
Garlic Butter Sauce Ingredients
- Garlic – Must be fresh and finely diced. Keep a keen eye on it as it fries to ensure it doesn’t brown, otherwise, it’ll turn bitter.
- Butter – Salted or unsalted, just be conscious of seasoning if you’re using salted.
- Parsley – A classic addition to garlic butter. Again, must be fresh!
- Parmesan – Not so much of a classic ingredient in garlic butter, but it certainly is with pasta and pasta sauces in general. This gives the garlic sauce a punch of flavour.
Starchy Pasta Water
One final key ingredient in the sauce is the water your pasta is cooked in. This is an important ingredient as it helps create an emulsion with the butter. If you just toss the pasta in butter, it’s going to dry up and go greasy. The starch in the pasta water helps create a slightly creamy sauce.
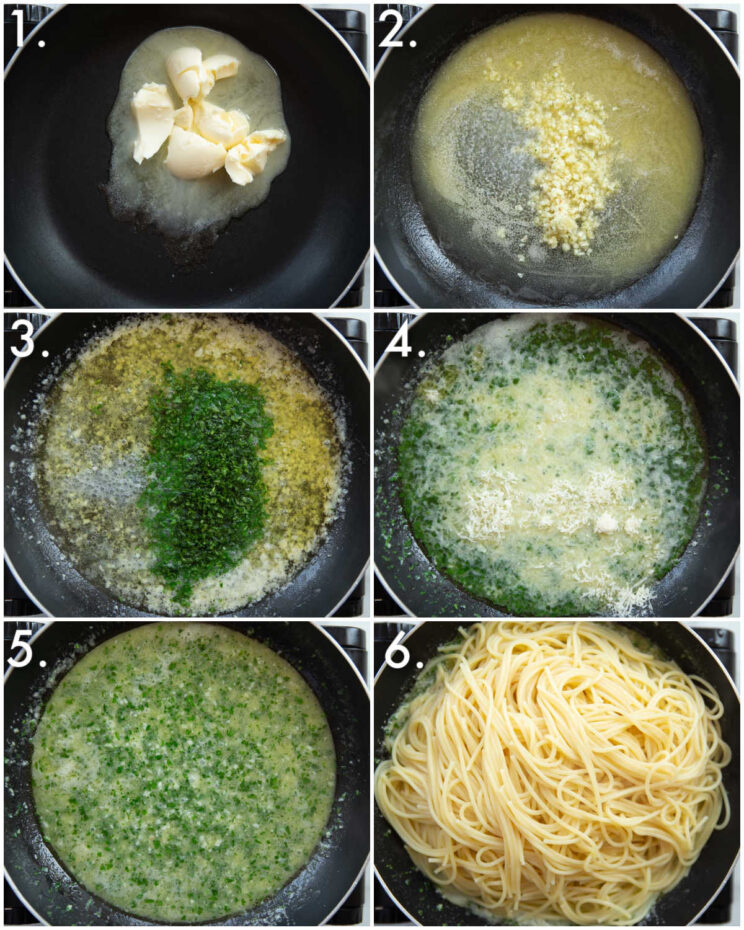
Process shots: melt butter (photo 1), fry garlic (photo 2), whisk in pasta water and parsley (photo 3), add parmesan (photo 4), stir until melted (photo 5), add pasta (photo 6).
Chicken Kiev Pasta FAQ
What kind of pasta to use?
I love using spaghetti, but in reality you can use any long cut pasta. The longer noodles allow for the silky buttery sauce to wrap around them more easily. They also make a nice ‘bed’ to rest the sliced chicken on top.
Can I bake the chicken instead of frying it?
I recommend frying for optimum crispiness, but you can bake instead of fry if you’d prefer (more on this in the recipe card notes below).
Can I make this ahead of time?
I don’t recommend making this ahead of time. Mainly because buttery pasta recipes never reheat well, but also because the chicken will lose crispness.
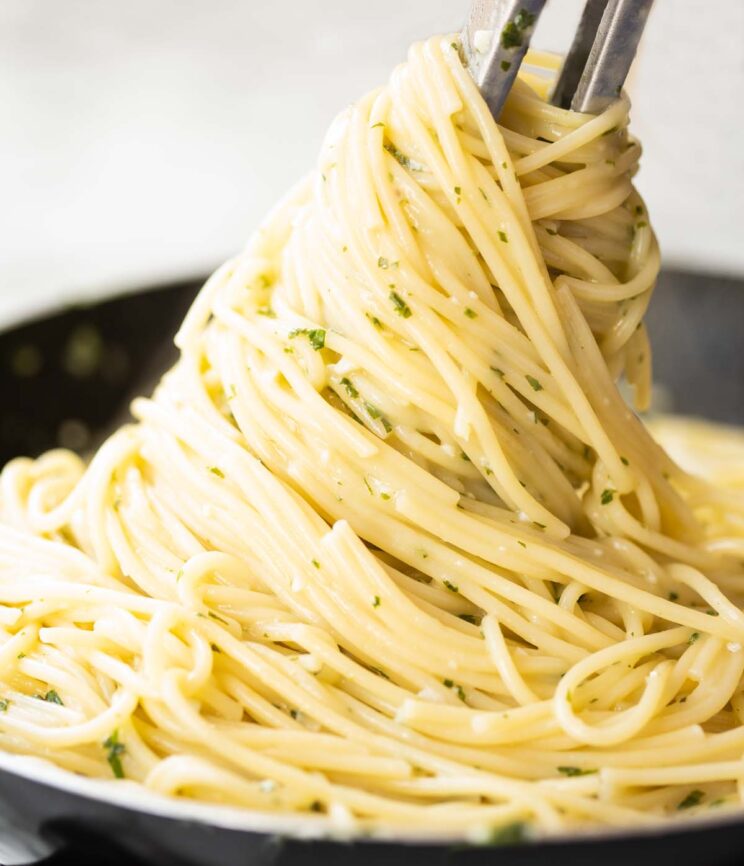
Serving Chicken Kiev Pasta
When it comes to serving, I like to serve individual portions of garlic butter pasta with a sliced crispy chicken breast each. From there, I usually top with leftover parsley and parmesan. I also like to serve with a lemon wedge, just to give people the option if they want it. The lemon juice will cut through the richness of the sauce; the flavour of lemon also goes perfectly with garlic, butter, parsley and chicken!
Alrighty, let’s tuck into the full recipe for this Chicken Kiev pasta shall we?!
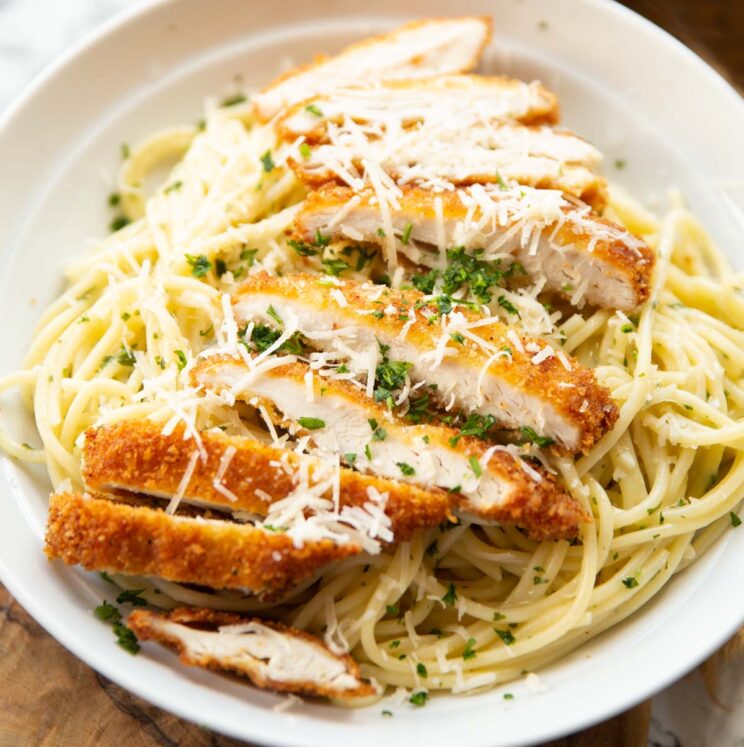
How to make Chicken Kiev Pasta (Full Recipe & Video)
Chicken Kiev Pasta
Equipment
- 3 Large Shallow Dishes (for dredging chicken)
- Large Pot (for boiling pasta)
- Wire Rack & Tray (for resting chicken)
- Large Deep Pan & Tongs (for pasta/frying chicken)
- Sharp Knife & Chopping Board (for chopping parsley/chicken/garlic)
- Small Pot (for chicken seasoning)
Ingredients
Crispy Chicken
- 2x 7-9oz/200-250g Chicken Breasts
- 1/4 cup / 35g Flour
- 1 cup / 60g Panko Breadcrumbs
- 2 Eggs, beaten
- 1 tsp Salt
- 1/2 tsp EACH: Black Pepper, Garlic Powder, Onion Powder (can sub onion powder for more garlic powder)
- 1 cup / 240ml Vegetable Oil, or as needed
Garlic Butter Pasta
- 1lb / 500g Spaghetti
- 3.5oz / 100g Butter (see notes)
- 6 large cloves of Garlic, very finely diced (don't use jarred garlic – must be fresh!)
- 1 small bunch (approx 1oz/30g) Fresh Parsley, very finely diced (save a pinch to serve)
- 1/2 cup / 40g freshly grated Parmesan, plus more to serve
- 4 Lemon Wedges, to serve
Instructions
- Seasoning: In a small pot combine 1 tsp salt with 1/2 tsp onion powder, garlic powder and black pepper.
- Prep Chicken: Slice the chicken breasts right through the centre to make 4 even-sized breasts.
- Dredge Chicken: Line up 3 bowls – the first is flour with half of the seasoning, the 2nd is two beaten eggs and the 3rd is Panko and the rest of your seasoning. Coat the chicken in the flour, then into the egg and finish with a coating of the Panko. Ensure the chicken is thoroughly coated at each stage, especially at the last stage.
- Fry Chicken: Heat up enough oil to comfortably cover the base of a large deep pan over medium heat. You want the oil around 350F/180C (drop a few crumbs in to test if they rapidly bubble). Carefully place chicken in 2 breasts at a time and fry for 3-5mins on each side, or until golden on the outside and white through the centre. Place on a wire rack with a tray underneath to catch excess oil. Slice into thin strips just before serving.
- Pasta: Once the chicken has fried, pop the spaghetti in heavily salted boiling water and cook until al dente. Scoop out 1/2 cup of starchy pasta water close to the end of cooking.
- Garlic Butter Sauce: Start the sauce a few mins before the pasta is cooked. Discard oil from the pan, then melt in butter over medium heat. Add garlic and fry for 1-2min (make sure it doesn't brown) then whisk in 1/2 cup starchy pasta water until it turns cloudy.
- Garlic Butter Pasta: Use your tongs to transfer the cooked spaghetti straight into the sauce and toss to combine, then toss in the parmesan and parsley. Continue tossing and adding more leftover pasta water as needed until the spaghetti is wrapped in a creamy, glossy sauce. Season to taste with salt and black pepper.
- Serving: Serve individual portions with sliced crispy chicken on top, alongside leftover parsley and parmesan with a lemon wedge if desired!
Video
Notes
- Fry the Panko breadcrumbs over medium heat in 1 tbsp butter until golden, then leave to cool before mixing with seasoning.
- Continue with recipe up until frying, then place breaded chicken on a wire rack above a baking tray. Spray with oil.
- Bake in the oven at 425F/220C for 10-12mins until the chicken begins to crisp, take out and carefully flip. Rotate tray and place back in the oven for another 5-10mins or until the chicken is golden crispy. Timings will depend on thickness of chicken, so just be vigilant.
Your Private Notes:
Nutrition
Looking for more?
You’ll find plenty more delicious comfort food like this in my Debut Cookbook ‘Comfy’
After another Chicken Kiev recipe? Check out my Classic Chicken Kiev and Mini Chicken Kiev Balls!
Looking for more similar recipes? Check out these beauties:
Chicken Pasta Recipes
- Peri Peri Chicken Pasta
- Spicy Chicken Pasta
- BBQ Chicken Pasta
- Chicken and Chorizo Pasta
- Chicken and Mushroom Pasta


Hi Chris, big fan of the site. I’ve done dozens of recipes off this and been meaning to thank you. This just didn’t work for me though. Great concept and there were some good bits. I’ve used the method of frying before now following a recipe from ThatDudeCanCook for a chicken parmo and it is a solid method. I use Peanut/Groundnut oil on a recommendation and find that great.
Anyway, I did the chicken and did my partner’s tea (I eat a bit later), she said it was a bit bland and there were big clumps of parmesan and parsley together. I had eyeballed the water and the parmesan and used a bit too much of both in all likelihood. Later, I did mine with exact measured amounts and the same happened. There were big clumps of parsley and parmesan after the spaghetti was added to the emulsion. It was also aggressively bland. I added plenty of seasoning as well as extra parmesan, lemon juice and chili flakes as per the suggestion in the other comment but it just didn’t make a dent. I think it was because of the big clumps rather than the flavour being dispersed.
Do you have any suggestions on what may have caused the clumping and how it could be avoided? I’d try it again if I knew that could be solved so holding back on review.
Simon, thank you so much for the thorough review. It’s really great to hear you’ve enjoyed other recipes and I’m gutted to see this didn’t turn out well for you!
This dish doesn’t have to most explosive flavour. It’s subtle, but certainly still enjoyable and shouldn’t be bland. I think you’re right – the blandness is likely to have came from the clumped parmesan, which will have no doubt stolen some of the garlic too.
My instinct is that the pasta water wasn’t starchy enough, meaning you’re essentially trying to melt parmesan into water. There also wouldn’t be enough starch to bind everything together, so there’s no cohesiveness flavours and textures. With recipes like these, I always try and boil the pasta in only just enough water to cook it without it drying out/sticking to the pan. That way you’re leftover with the starchiest pasta water possible AND the most well seasoned too.
Another guess could be the type of parmesan? Freshly grated typically blends through sauces with ease, where pre-grated or the dusty variety can sometimes struggle.
In hindsight, just reading through the recipe, I’d probably make 2 tweaks:
1. A much safer method is to toss the spaghetti in with the butter and pasta water until it just starts to emulsify and thicken. Then toss in the parmesan and then toss in the parsley, using more pasta water to create the sauce from there if needed.
2. Don’t scoop the pasta water out before it’s cooked. Just transfer the pasta straight from the pot then scoop from the leftover pasta water (so you know it’s as starchy as it can be).
I think in general though, I’m definitely going to give this recipe another run through myself before offering any solid advice and tweaking the recipe.
Thanks for flagging this though and without going straight in with a horrendous review. Really appreciate it and sorry again to hear it didn’t work for you (I hate bland food!!).
Chris.
We loved this so much. We did use 8 cloves of garlic and served with red pepper flakes. Everyone agreed it will be a regular. Thanks for the recipe!
Great to hear it went down well, Karen! Thanks for popping back for a review 🙂 C.