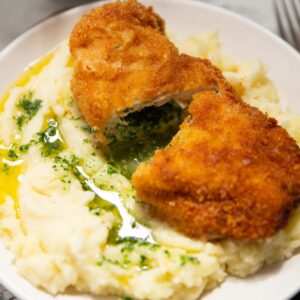
Chicken Kyiv
Here I'll show you how to make a Chicken Kyiv that's super crispy on the outside with so much garlic butter pouring out the centre! Please watch the video and read the notes before starting.
Servings: 2
Cost: £4 / $5
Equipment
- Sharp Knife & Chopping Board
- Small Mixing Bowl (for butter)
- Cling Film (for freezing butter)
- Small Sharp Knife (preferably slightly shorter than the length of the breasts)
- 3 Large Shallow Dishes (for coating chicken)
- Large Heavy-Based/Cast-Iron Pan & Tongs (for frying chicken)
- Large Tray, Foil & Wire Rack (for baking chicken)
Ingredients
Garlic Butter
- 80g / 2.8oz Unsalted Butter, slightly softened (or salted without the 1/4 tsp salt added)
- 3 cloves of Garlic, finely grated then mashed into a paste with the side of your knife
- 1 tbsp very finely diced Fresh Parsley
- 1/4 tsp Salt
Chicken
- 30g / 1oz Plain Flour
- 2 medium Eggs, beaten
- 60g / 1 cup Panko Breadcrumbs
- 2x 250g/9oz Chicken Breasts, taken out the fridge 30 mins before needed (see notes)
- 1/2 tsp EACH: Salt, Paprika, Onion Powder plus more salt as needed
- 1/4 tsp Black Pepper, plus more as needed
- 400ml / 1 3/4 cups Vegetable Oil, or another oil with a high smoking point i.e. sunflower
Instructions
- Garlic Butter: Use a fork or spatula to combine the garlic butter ingredients in a medium mixing bowl. Scrape onto a flat surface and form a 9 x 6cm rectangle (doesn’t have to be exact). Wrap in cling film and place in the freezer until very firm. Depending on how powerful your freezer is this can take anywhere between 30 minutes to 2 hours.
- Recipe Prep: During this time I recommend getting everything ready for the rest of the recipe. Line up three bowls: one with flour, one with the beaten eggs and the last with the breadcrumbs. Combine the salt, paprika, onion powder and black pepper in a small bowl. Mix half into the flour and the other half into the breadcrumbs. Line a large baking tray with tin foil and place a wire rack on top. Fill a large cast-iron or heavy- based frying pan with the oil.
- Slicing: Place the chicken breasts with the thin tail part facing away from you and the thickest end closest to you. Use a small, sharp knife to slice through the middle of the thickest part and very carefully push the knife towards the thin end, making a tunnel through the centre of the chicken. Take your time and be very careful not to slice through the top, bottom or end of the chicken. Any tears or holes will leave room for the butter to leak out. I recommend flipping the chicken a couple of times as you slice through to make sure the knife doesn’t poke outside the chicken.
- Once the knife is in you can gently twist it to make the tunnel as wide as you can. The aim of the game here is to make as much for room for the butter as possible. Season both sides of the breast with a pinch of salt and pepper, then repeat with the second breast.
- Stuffing: Once the butter has frozen, slice it into three long strips, then slice one of the strips in half. Ideally, you’ll slot one of the short strips into the short side of the breast, and the longer one down the centre. However, this isn’t always achievable, so slice and shape the butter in any way you need to carefully slot as much as you can inside the chicken without it tearing. Make sure you leave a small gap at the opening.
- Once the butter is inside, slice off a small piece of stray meat from the edge of the chicken and use it as a plug to cover the opening. This will help prevent the butter from leaking out.
- Coating: Coat the chicken in the flour, then the beaten egg, then the breadcrumbs. Dab the thick end with the seam back into the egg and coat in the breadcrumbs again. Repeat this once more to build up a thick crust to prevent the butter from leaking out.
- Cooking: Preheat the oven to 180°C/350°F. Heat the oil in the pan over a medium heat until it reaches 180°C/350°F. This will take around 10–12 minutes. When it’s hot enough, a breadcrumb should rapidly sizzle when it hits the oil.
- Place the chicken Kyivs in the oil and fry for 2 minutes and 30 seconds. Carefully flip them over and fry the other side for 2 minutes and 30 seconds. Use a spoon to baste any parts of the chicken that aren’t submerged in the oil, namely the end with the seam. Place the chicken on the wire rack set over the foil-lined tray and bake in the oven for 14 minutes.
- Serving: Leave to rest for a minute or so before slicing. Spoon over any butter that leaked out, then serve with an extra pinch of salt if desired.
Video
Notes
a) If you slice through the chicken - I recommend slicing off any stray bits of meat and using them as a plug to cover the gap as best you can. I also recommend building up a thicker crust on that particular part of the chicken, as you do with the seam.
b) If the butter leaks out - some butter leakage is very likely, so don’t panic too much if you see some on the foil when it comes out of the oven. If there’s a significant amount in the tray, just serve it spooned over the chicken at the end. The garlic and parsley will still be inside the chicken. The main prevention tactic is making sure the butter is frozen, so it only starts melting towards the end of cooking – i.e. there’s less time for it to leak out.
c) Cooking times - you can use smaller breasts, approx. 200–220g, which will bake in around 13 minutes, although you may not be able to fit as much butter into smaller breasts; 230–250g breasts will take 14 minutes and larger breasts weighing around 260–280g will take 15–16 minutes. In all cases you’re looking for the chicken to be piping hot right through the centre with no trace of pink. The thickest part of the chicken should reach 75°C (make sure you don’t pierce into the butter when checking!).
d) Calories - per Kyiv assuming half the breading ingredients attach and 1 tbsp oil is soaked up per Kyiv.
e) Cookbook– this recipe is featured in my debut cookbook ‘Comfy’.
Nutrition
Calories: 786kcal | Carbohydrates: 15.15g | Protein: 61.08g | Fat: 52.38g | Saturated Fat: 24.416g | Polyunsaturated Fat: 10.779g | Monounsaturated Fat: 13.617g | Trans Fat: 1.396g | Cholesterol: 310mg | Sodium: 1111mg | Potassium: 730mg | Fiber: 0.9g | Sugar: 1.04g | Vitamin A: 1348IU | Vitamin C: 3.9mg | Calcium: 85mg | Iron: 3.75mg