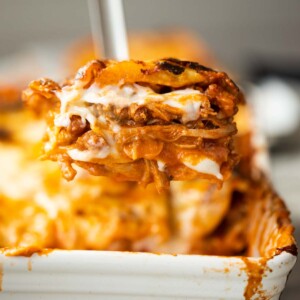
This lasagne is layered with a rich chicken and pancetta ragu alongside a cheesy bechamel sauce!
Today I’m excited to share with you an incredibly delicious twist on the classic lasagne. It’s packed with so much flavour, I’ve got a feeling you’re going to love it. Follow me…

Chicken and Pancetta Lasagne
Typically a lasagne would be made with a minced/ground beef ragu, maybe even with pork or sausage in there. But today we’re using chicken, which really does work so delightfully.
What kind of chicken should I use?
You’ll definitely want to use chicken thigh over chicken breast. Breast will dry out over the long cooking period, whereas thighs are much more robust. Plus, chicken thighs are more fatty and with that, they add bags more flavour to the sauce.
Pancetta
I love adding pancetta to the ragu for a few different reasons:
- Fat – you can render down the fat and use it to fry the chicken thighs.
- Flavour – pancetta adds heaps of smoky flavour to the ragu.
- Pairing – great with chicken.
To kick off the ragu, we’re going to extract the fat from the pancetta and fry the thighs in it. The thighs don’t need to be cooked all the way through, just focus on developing flavour on the outside.
Process shots: add pancetta to pan (photo 1), fry then remove (photo 2), add thighs (photo 3), fry then remove (photo 4).

Chicken Ragu
Once you’ve fried the chicken, leave all of the excess fat in the pan (aka liquid gold). We’ll use this to fry the carrot, onion, garlic and celery.
From there, we’re going to create a rich tomato sauce. The base is tomato passata and tomato paste, but we’re also going to add in some red wine for some depth of flavour. Other than that you don’t need much more fuss, just some bay leaves and fresh thyme for a boost of flavour.
Simmering the Ragu
We’re going to simmer the ragu with the lid on and then with the lid off. A generous simmering time is important for a few different reasons:
- Chicken – simmering will help tenderise the chicken.
- Flavour – it will give time for the flavours to marry together.
- Reduce – removing the lid will help reduce and thicken the sauce.
Once you’ve simmered the ragu, just remove and shred the chicken, then stir it back through the sauce. You can then leave it as you make the bechamel sauce.
Process shots: fry carrot, onion, celery, garlic (photo 1), fry tomato paste (photo 2), simmer red wine (photo 3), add chicken, pancetta, chicken stock, bay leaves and thyme (photo 4), simmer (photo 5), remove and shred chicken then place back in sauce (photo 6).

Bechamel Sauce for Lasagne
What is a lasagne without the bechamel sauce? There are of course many recipes that don’t use it, namely American-Italian recipes that often use ricotta, but using bechamel is the elite option (IMO).
We’re also going to make this cheesy by adding some Cheddar! I have also tried this recipe with Gruyere, which works really nicely too.
Bechamel Sauce Seasoning
To spruce up the sauce I recommend some salt and white pepper (although you could use black) alongside some nutmeg. The nutmeg is essential – it gives the sauce such a lovely boost of flavour!
Process shots: melt butter (photo 1), stir in flour (photo 2), add milk then add cheese (photo 3), season (photo 4).

Assembling Chicken Lasagne
I like to use fresh lasagne sheets because I prefer the texture (the lasagne stays intact better i.e. not so wavey).
From there the layers go as follows:
- Layer 1: Lasagne Sheets
- Layer 2: Chicken Ragu
- Layer 3: Bechamel Sauce
- Layer 4: Mozzarella (just on the top)
You’ll end up with 4 layers of pasta, 4 layers of bechamel, 3 layers of ragu and 1 layer of mozzarella.
Process shots: spread some sauce in dish to prevent sticking (photo 1), add lasagne sheets (photo 2), add ragu (photo 3), add bechamel (photo 4), repeat and finish with bechamel sauce (photo 5), add mozzarella and bake (photo 6).

Serving Chicken Lasagne
Once the lasagne is out of the oven it’s important that you let it rest. If you slice in straight away the layers will slide about. They need time to retain their shape.
Here I’ve served with some Garlic Bread and a Side Salad!
Alrighty, let’s tuck into the full recipe for this chicken and pancetta lasagne shall we?!

How to make Chicken Lasagne (Full Recipe and Video)
Delicious Chicken Lasagne
Equipment
- Sharp Knife & Chopping Board
- Large Deep Heavy-Based Pot with Lid (for ragu)
- Wooden Spoon & Tongs
- Large Baking Dish (mine is 12×9" / 30x22cm)
- Medium Sized Pot & Whisk (for bechamel)
- Large Baking Tray (to place underneath baking dish)
Ingredients
- 350g / 12oz Fresh Lasagne Sheets
- 150g / 1 1/2 cups Mozzarella, shredded
Ragu
- 200g / 7oz diced Pancetta (see notes)
- 1kg / 2lb boneless skinless Chicken Thighs (see notes)
- 1/2 tsp EACH: Salt & Pepper, plus more as needed
- 2 medium Carrots, finely diced
- 2 ribs of Celery, finely diced
- 1 large White Onion, finely diced
- 4 cloves of Garlic, finely diced
- 75g / 1/4 cup Tomato Puree (Tomato Paste in US)
- 160ml / 2/3 cup Dry Red Wine (see notes)
- 1x 690g/1.5lb jar of Tomato Passata (Pureed Tomatoes in US)
- 240ml / 1 cup Chicken Stock
- 2 Bay Leaves
- 1/2 tbsp Fresh Thyme Leaves (roughly 8-10 sprigs)
Bechamel
- 60g / 2oz Unsalted Butter
- 60g / 2oz Plain Flour
- 1 litre / 4 cups Milk (I use semi-skimmed)
- 200g / 2 cups Cheddar, grated (Gruyere also works nicely)
- 1/4 tsp EACH: Ground Nutmeg, White Pepper (sub black), Salt, or to taste
Instructions
Ragu
- Add the pancetta to a large deep heavy-based pot over medium heat (no oil needed). Fry until the pancetta is crisp with the fat rendered down. Remove and place in a large baking dish (mine is 12×9" / 30x22cm), leaving the fat behind.
- Season the chicken thighs with 1/2 tsp salt and pepper. Increase the heat to high and fry the thighs for around 1 minute 30 seconds each side, or until light golden. Don't try and cook the chicken through at this point, this is just to add some colour and develop flavour. Work in batches if you need to.
- Remove the thighs and place in the baking dish with the pancetta, leaving all of the excess fat behind. Lower the heat slightly to medium-high and add the carrot, celery and onion. Fry until it all softens and begins to colour, then add the garlic and fry for another minute. Stir in the tomato puree and fry for a minute, then stir in the wine. Simmer for 2 minutes to reduce and re-thicken into a paste.
- Pour in the passata and swill out the jar with 1/4 cup of water. Stir in the chicken stock, bay leaves and thyme, then stir in the chicken thighs pancetta alongside all of the resting juices. Bring to a simmer, then place the lid on, reduce heat to low and allow to gently bubble away for 30 minutes. Remove the lid and gently simmer for a further 20 minutes to thicken the sauce.
- Use tongs to remove the chicken and place it back in the baking dish. Shred the chicken with two forks, then stir it back through the sauce. Adjust seasoning if desired then leave to one side as you proceed with the bechamel sauce.
Bechamel Sauce
- Melt the butter in a medium-sized pot over medium heat. Stir in the flour to create a roux, then gradually add in the milk, whisking as you go to avoid lumps. Bring to a simmer and allow it to cook, stirring regularly, for around 8-10 minutes until the sauce thickens.
- Turn off the heat and stir through the cheese until it melts, then season with nutmeg, salt and pepper. Remove the pot from heat. The sauce should be fairly thick and comfortably coat the back of a spoon. It will thicken more as it rests.
Lasagne
- Preheat the oven to 180C/350F.
- Spread a few spoonfuls of the ragu sauce in the baking dish (this is just to prevent the pasta sticking). Add a layer of lasagne sheets, cutting them into shape as needed. Spread over 1/3 of the ragu, then top with a drizzle of bechamel, then top with more lasagne sheets. Repeat 2 more times, finishing with a layer of bechamel and mozzarella on top. That's 3 layers of ragu, 4 layers of pasta and 4 layers of bechamel.
- Place the lasagne on a large baking dish, just to catch any spillage. Place in the oven for 35-40 minutes, or until deep golden/lightly charred on top and bubbly around the sides.
- Rest for 10-15 minutes to help it retain its shape, then slice and serve up!
Video
Notes
Your Private Notes:
Nutrition
Looking for more?
You’ll find plenty more delicious comfort food like this in my Debut Cookbook ‘Comfy’
For more similar recipes check out these beauties:


Hello, I’m just cooking this up now, but I noticed the video scrambles at 15 seconds in…. is it just me?
Not sure what’s going on there – I’ve just checked and it seems to be working fine. Have you refreshed the page and tried again? Sorry you’re having issues (the full written recipe should cover everything). C.
Awesome recipe everyone loved it! The quantity gave me enough to make a lasagna for 4 plus extra ragu. I was going to freeze but hungry workers were
Already eating it while the lasagne was cooking
So pleased to hear, Lynn! 🙂 C.
Hi, really love your recipes and the way you explain everything so clearly. !!
My only question on this one is do you soak your fresh lasagna sheets?
I never have in the past but got some from sainsbury’s and noticed the instructions say to soak them in water for 2 mins before use.
Hey Suzie! I don’t soak fresh lasagne sheets, no. Hope the lasagne goes down well! C.
Hiya Chris, the chicken lasagna was off the scale, my family absolutely devoured it, it’s a firm favourite
So pleased it went down well, Wendy! 🙂 C.