Here I’ll share with you some tips and tricks for making the most incredible traditional fish and chips.
As a Brit who grew up by the seaside, I can safely say I know a thing or two about fish and chips. I made it my mission to come up with a homemade recipe that produces insanely crispy battered fish that’s moist and flaky, alongside fluffy, crunchy chips. After many rounds of testing, I’m happy to report this recipe is not only approachable, but it only requires basic, store-bought ingredients and is genuinely better than most fish and chips I’ve ever had. I’m confident you’ll find the same. Follow me…
Homemade Chips
The importance of the chips in this classic pairing is often overlooked. For me, the perfect chip is chunky and crispy on the outside, and fluffy in the centre. In order to achieve the perfect chip, we’re essentially going to triple cook them. We’ll talk about the cooking process in just a sec, but first things first, let’s talk about the potato itself.
For the perfect texture, you need the perfect potato, and in this context, you’re looking for a floury/baking variety of potato like a Maris Piper or Russet. These types of potatoes end up fluffy when cooked correctly, which is exactly what we want here.
Preparing the chips
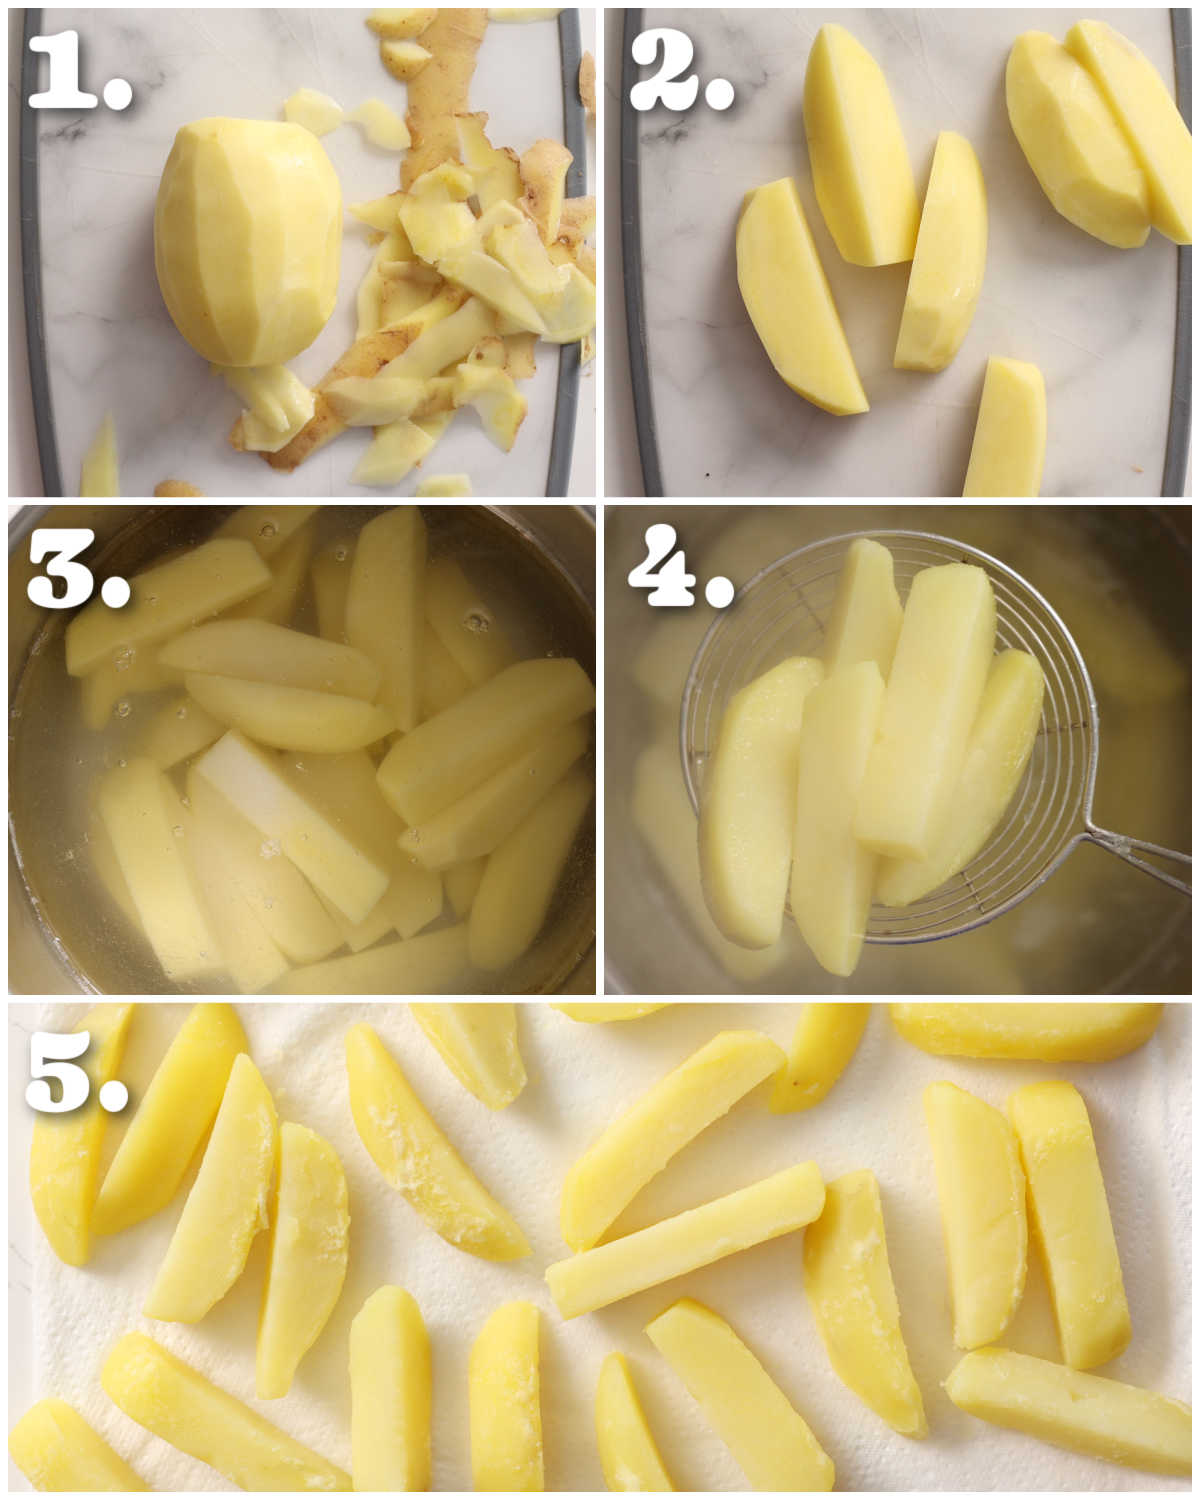
Traditionally, you peel the potatoes for chip shop chips, and that’s what we’re doing here. From there, you’ll want to slice them into thick chips. Remember, it’s fish and chips, not fish and ‘fries’. They will shrink very slightly as they cook, so definitely keep them on the chunkier side.
Parboiling the chips
For stage 1 of the triple cook, we’ll be parboiling the chips. This is for a few different reasons:
- Season – it’s a chance to get some seasoning into the potato itself.
- Starch – parboiling the chips will remove starch from the potato, which in turn, helps the chips stay nice and fluffy in the centre.
- Cook – parboiling gives the chips a head start before frying.
Once you’ve parboiled the chips, you’ll need to drain them and let them sit until they stop steaming. This step is crucial; the more steam that escapes = the less water inside the potato = the fluffier/crisper they’ll be. Once room temp, they’ll be going in the fridge to cool until ready to fry. Cooling the chips helps them build a crust, which in turn, is what allows them to crisp up in the oil.
Process shots: peel potatoes (photo 1), slice (photo 2), add to cold salted water (photo 3), parboil (photo 4), leave to steam then cool in fridge (photo 5).
Cooking the chips
Okay, chips have cooled, we now have 2 more quick cooking phases:
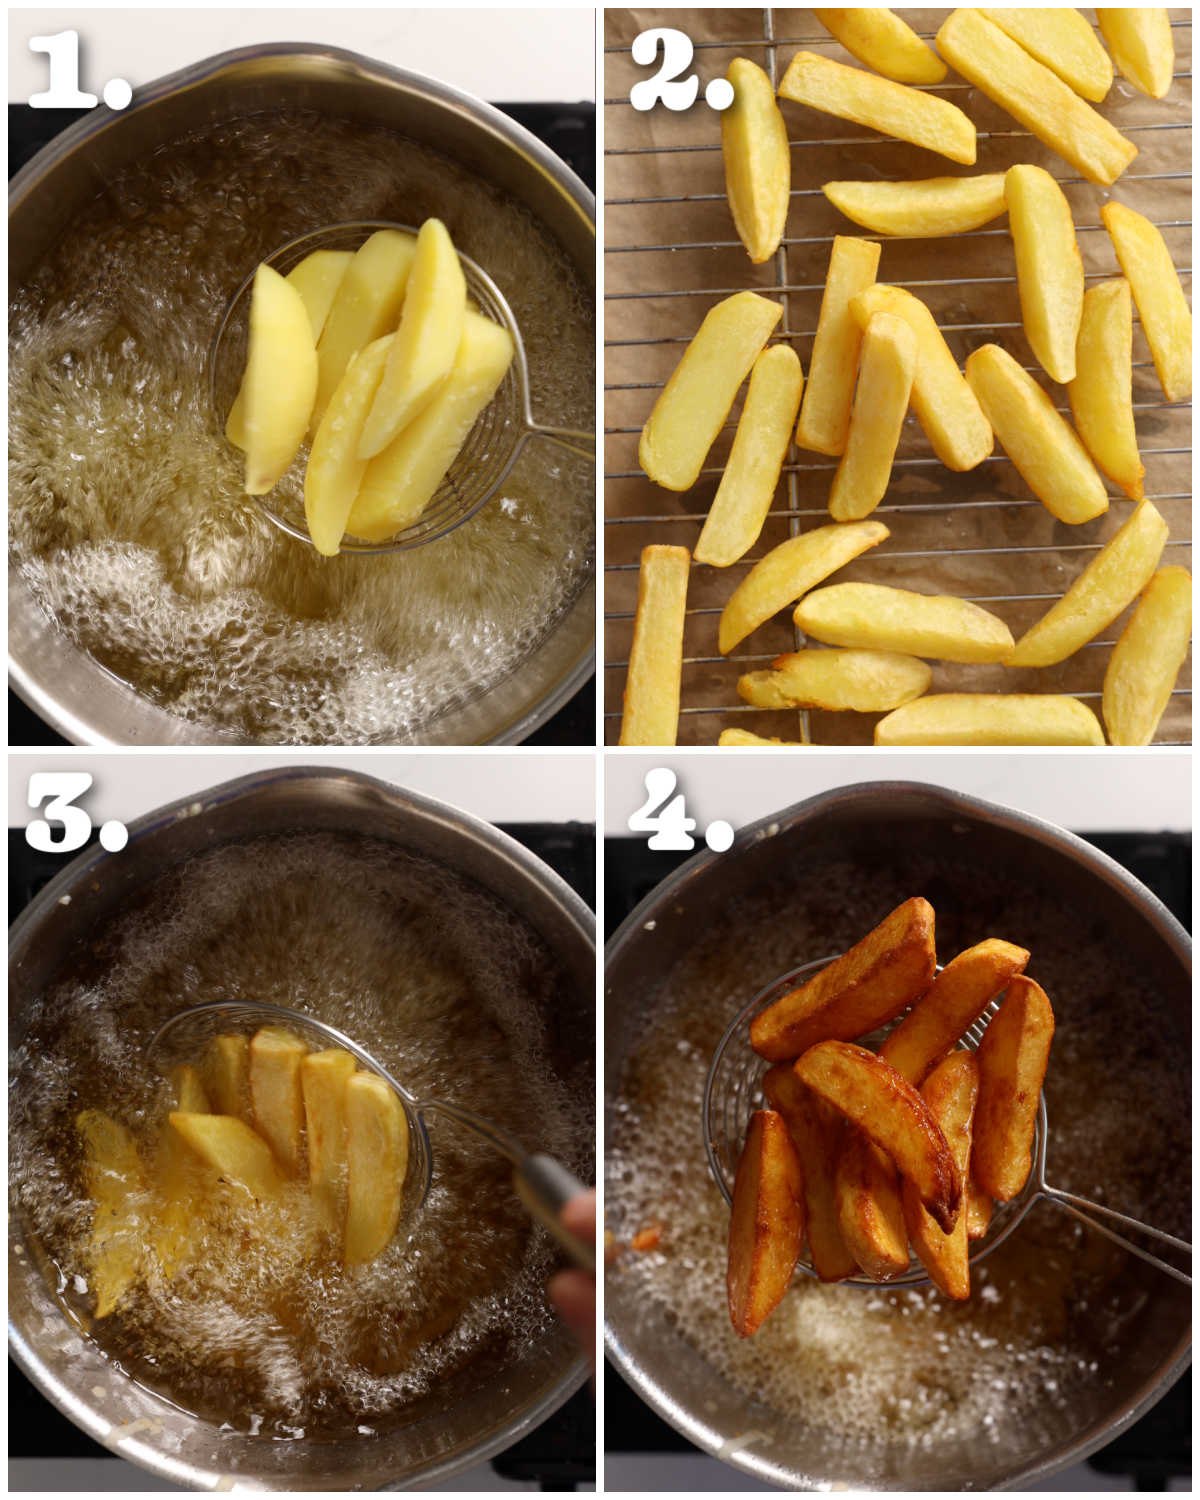
- Fry #1 – this will be at a lower temperature to cook the chips through without browning the outside.
- Fry #2 – this is at a higher temperature to get the chips to maximum crispiness.
The final colour is somewhat down to preference, but ideally you’re looking for a deep golden colour. I personally hate a pale chip as it often indicates them being undercooked, so I go for a slightly deeper golden than you might see at a chip shop.
Process shots: fry chips (photo 1), rest (photo 2), higher temp and fry again (photos 3&4).
Homemade Battered Fish
We will talk about the batter in just a sec, but first things first, let’s quickly chat about the fish itself.
The two most popular fish to use in fish and chips are Cod and Haddock. Plaice, Pollock and Hake are also sometimes used. For me personally, I always go Cod, which is generally the more traditional option in the UK. The main importance is that the fish is boneless and skinless. You might find some fish and chip shops in the UK that keep the skin on, but for me, this is just a posh stance and not overly traditional (or desirable in my personal opinion).
Preparing the fish
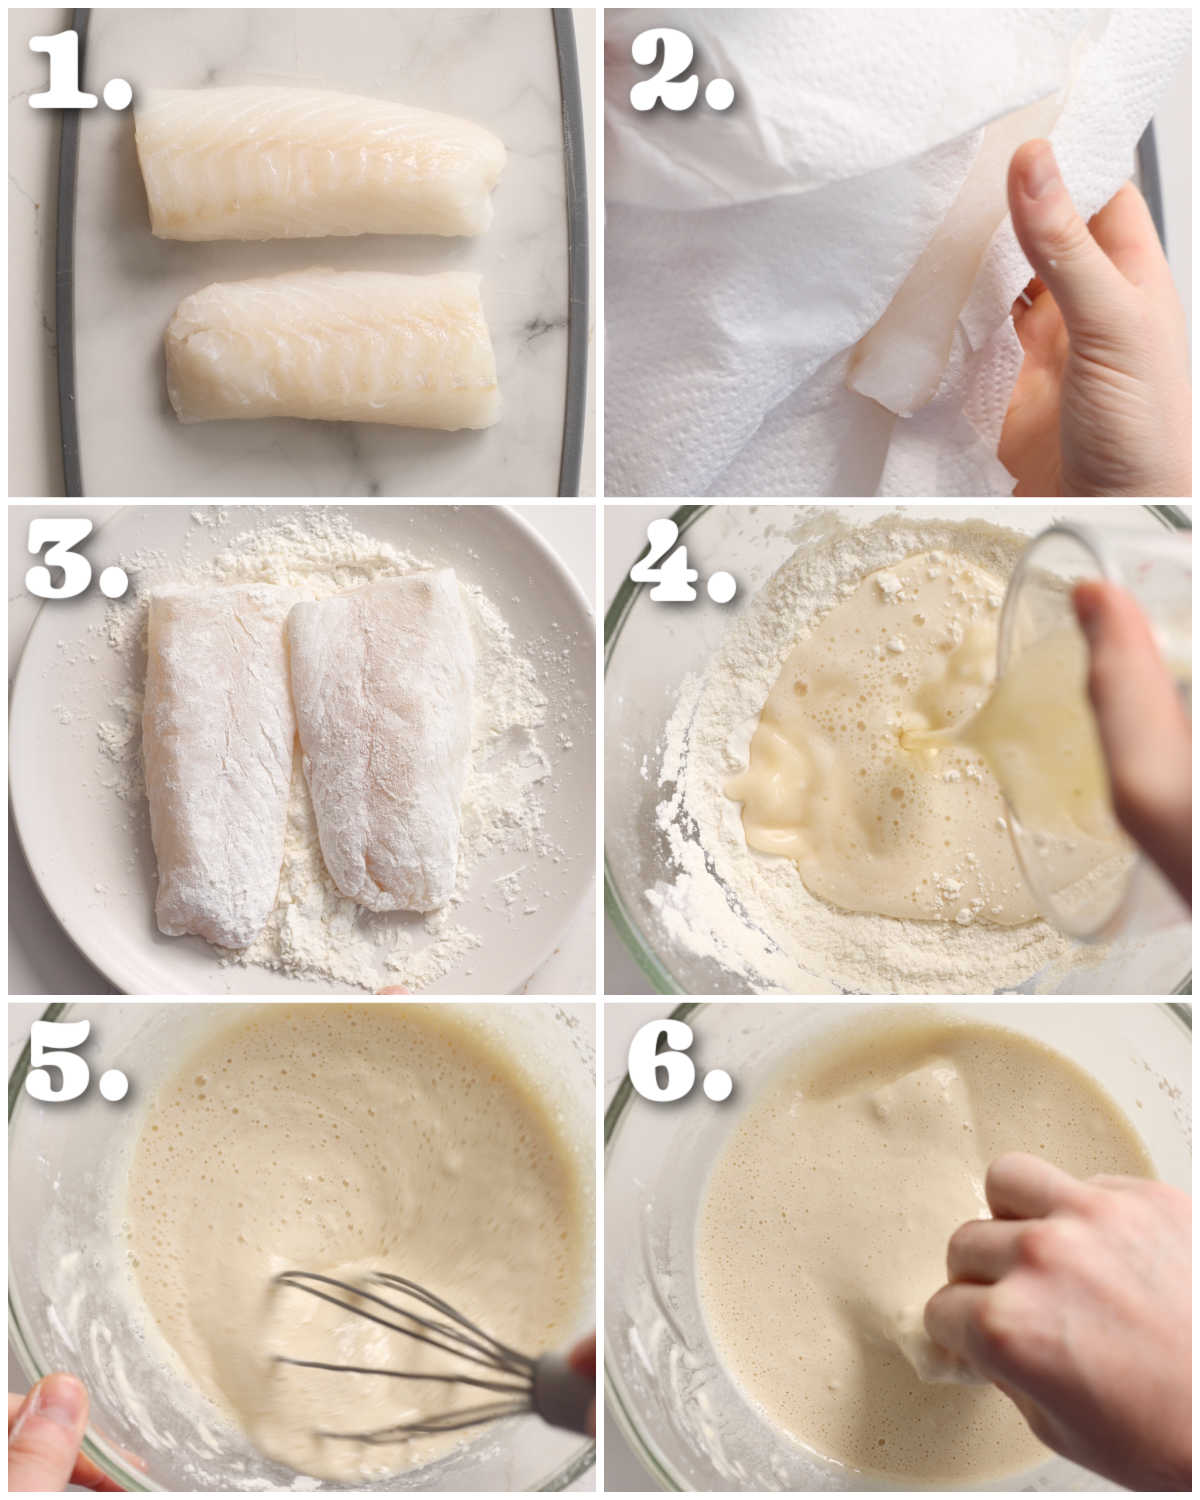
One trick is to salt the fish and let it sit for 10 minutes. This will draw out moisture from the surface of the fish, which would have otherwise caused the fish to steam when it fries. This in turn would cause the batter to go soggy. Just make sure you thoroughly pat the fish dry to remove this excess moisture.
Beer Battered Fish
We’ll be using beer in the batter for a few different reasons:
- CO2 – the air bubbles help create a puffy, delicate batter.
- Alcohol – the alcohol in the beer evaporates much quicker than water, meaning the crust dries out faster and crisps up more efficiently.
- Flavour – the beer adds a mild flavour to the batter.
Two things to keep in mind when using the beer: it must be fridge cold (causes more of a reaction and produces a more airy, crispy batter), and you should not over-mix the batter (beats out the air bubbles, which results in a flat batter).
Process shots: sprinkle cod with salt (photo 1), rest for 10 minutes then pat dry (photo 2), coat in flour and cornflour (photo 3), add flour, cornflour, baking powder, seasoning and beer to bowl (photo 4), gently whisk (photo 5), coat fish (photo 6).
Cooking the fish
When it comes to cooking the fish, I have one absolutely game-changing tip for you.
Heston Blumenthal Battered Fish
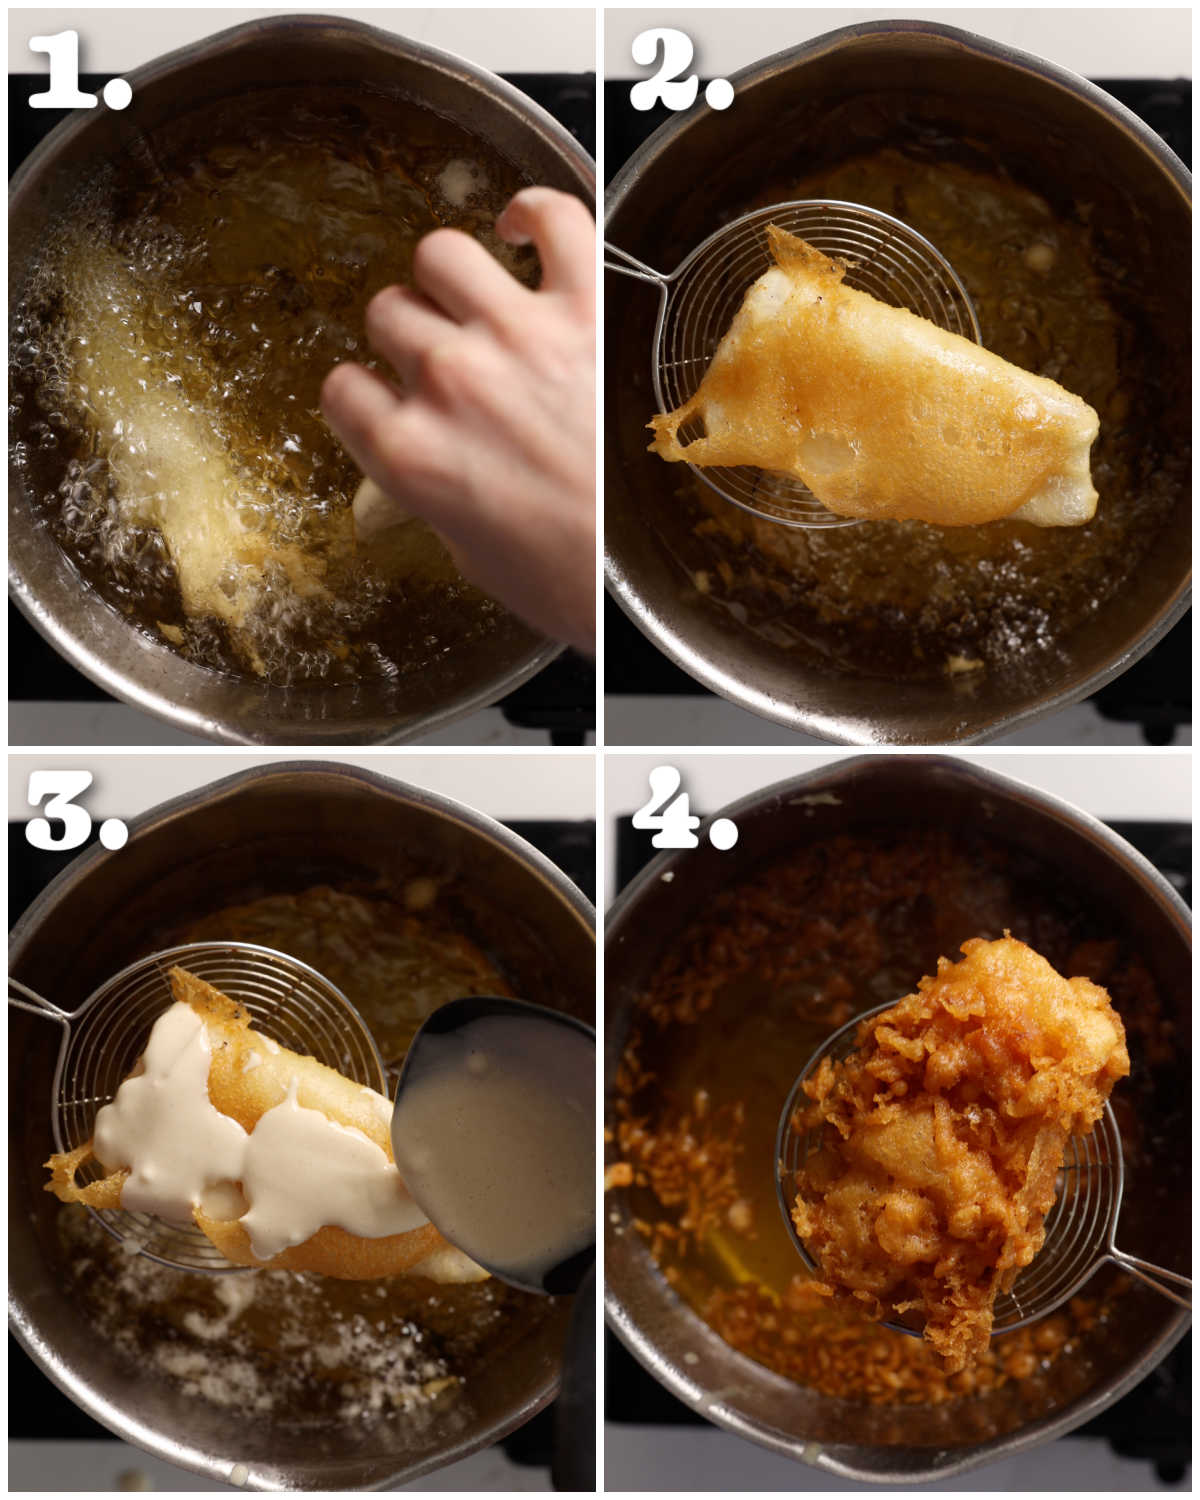
I spotted this trick from Heston, and it honestly changed the way I made fried fish. When you fry the fish, leave it for 1 minute, then lift it and drizzle some of the excess batter right over the fish in the pot. This results in EXTRA crispy, craggy fried fish. Plus, you end up with lots of ‘scraps‘ in the pot, which you can sprinkle over at the end (classic chip shop move).
Process shots: lower fish into oil (photo 1), lift (photo 2), drizzle with batter (photo 3), fry (photo 4).
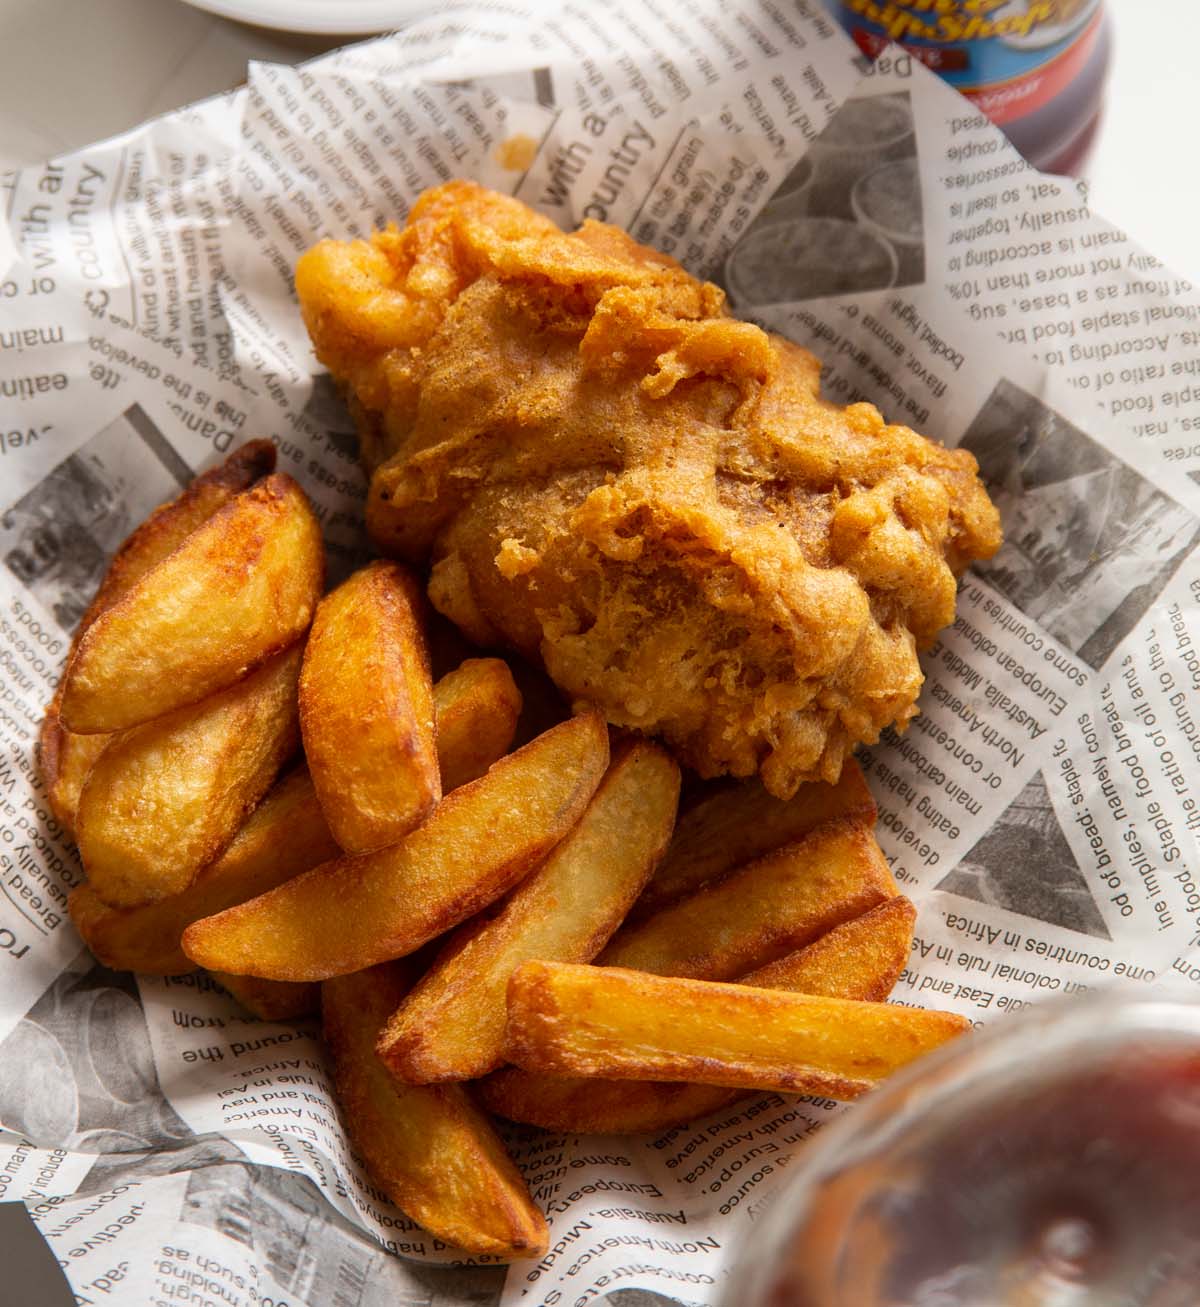
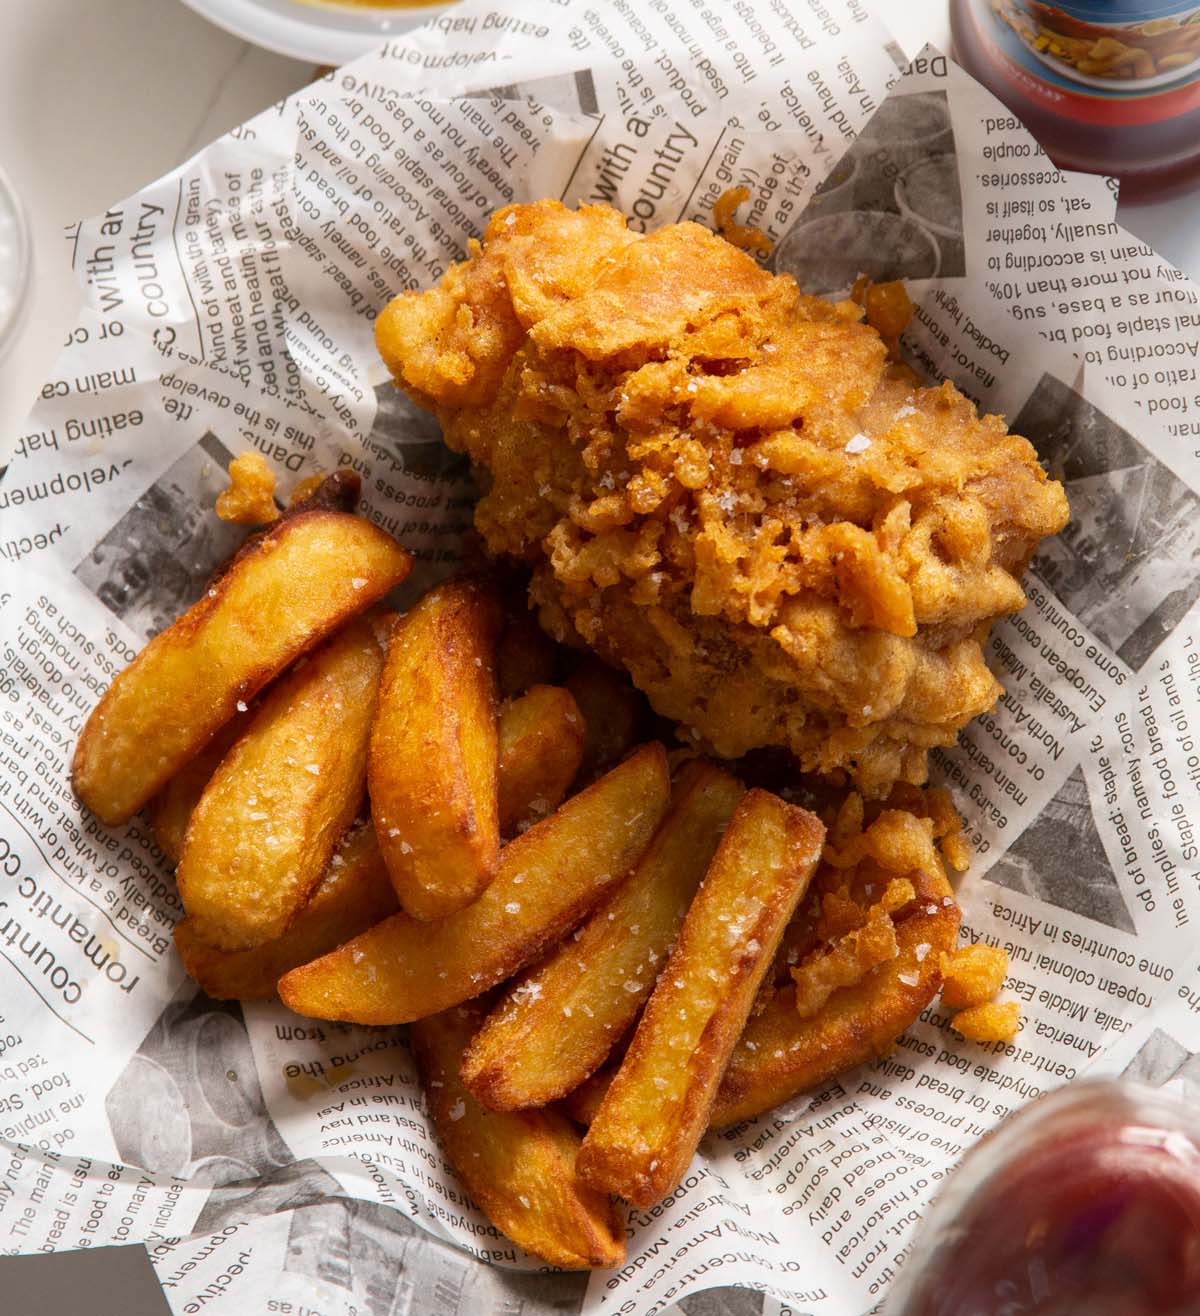
How to serve fish and chips
If we’re talking very traditional, you’re eating it out of a newspaper lined with greaseproof paper. Nowadays, due to health concerns, this practice has been phased out and is now typically eaten out of food-safe paper/cardboard boxes with a wooden chip fork. However, it’s certainly not frowned upon to eat it on a plate with a knife and fork, especially if you’re ordering to eat in the restaurant.
When it comes to the classic finishing touches, here’s what’s going on:
- Salt – non-negotiable. Flaky sea salt if you’re fancy, but fine table salt does the job just as well.
- Acidity – I go in with malt vinegar over both the fish and chips, but you could use lemon juice on the fish instead if you’d prefer.
- Sauce (optional) – I love curry sauce, but tartare sauce or ketchup are both classic options. I have been known to use salad cream too (a habit passed down from my father).
- Side (optional) – mushy peas, a pickled onion or egg and a buttered bread roll are all common side kicks of a fish and chip supper!
The batter will stay crispy longer than you think, so there’s no urgent rush, but you do want everything nice and hot, so tuck in as soon as you can.
Alrighty, let’s tuck into the full recipe for this classic fish and chips shall we?!
How to make Fish and Chips (Full Recipe & Video)
Homemade British Fish and Chips
Equipment
- Sharp Knife & Chopping Board
- Potato Peeler
- Paper Towels/Kitchen Roll
- Medium Sized Plate
- Large Mixing bowl & Whisk
- Jug (for beer)
- Large, Deep Pot suitable for deep frying
- Slotted Spoon
- Wire Rack
Ingredients
- 800g / 1.8lb Floury Potatoes, such as Maris Pipers/Russets, peeled and cut into thick chips around 8cm/3" long and 1.5-2cm/0.5-0.8" wide
- 2 1/2 tsp Salt, plus extra as needed
- 2 litres / 8 1/3 cups Vegetable Oil, or as needed (or other oil with high smoking point that is suitable for deep-frying)
- 125g / 4.4oz Plain Flour
- 45g / 1.6oz Cornflour/Cornstarch
- 1 1/2 tsp Baking Powder (not to be confused with baking soda!)
- 1/4 tsp White Pepper
- 2 boneless skinles Cod Loins (approx 140-150g/5-5.3oz each)
- 230ml cold Beer (see notes)
Instructions
- Place the potato chips in a saucepan of cold water with 2 teaspoons of the salt over a high heat. After around 10 minutes, it should reach a rapid boil. At this point, allow the chips to boil for about 5 minutes until the edges start to fray and they’re just about knife- tender. Remove with a slotted spoon and place on kitchen paper to absorb excess moisture. Don’t worry if any start to crack or break. Allow to rest for around 10 minutes, or until they stop steaming, then transfer to a baking tray and cool in the fridge for 1 hour. They should be fairly firm and cold right through.
- Meanwhile, pour the oil into a large saucepan, making sure it doesn’t fill more than half the depth of the pan. Mix 1 tablespoon of the flour and 1 tablespoon of the cornflour with a pinch of salt on a medium plate. Put the remaining flour, cornflour and salt into a large mixing bowl, then add the baking powder and white pepper and whisk to combine.
- Take the chips and cod out of the fridge. Sprinkle both sides of each cod loin with salt and leave for 10 minutes. This will draw moisture from the cod. After 10 minutes, use kitchen paper to thoroughly pat the cod dry. It’s important to remove as much excess moisture as possible to ensure the batter crisps up.
- Meanwhile, heat the oil over a medium-high heat to 180°C (350°F). When it's hot enough, a breadcrumb should rapidly sizzle when it hits the oil. Use a slotted spoon to carefully lower the chips into the hot oil and fry for around 4 minutes. The edges should be tinged golden, but they won’t be cooked all the way through. The oil temperature will drop, so just maintain it as best you can. Use the slotted spoon to remove the chips and rest them on a wire rack set over a baking tray or kitchen paper to catch any excess oil.
- Increase the heat to 190°C (375°F). Add the cold beer to the large mixing bowl with the flour mixture and whisk to combine. Don’t beat the heck out of it, otherwise you’ll lose all the bubbles. Just whisk until the flours have blended through the beer. Some small lumps are fine. The consistency should be ever so slightly thicker than double/heavy cream.
- Coat a piece of cod in the flour on the plate and shake off the excess, then add it to the beer batter. Make sure it’s fully coated, then place in the hot oil. As you lift it out of the batter let it hang for a few seconds, then carefully add it to the oil, pushing your hand away from you (so the oil doesn’t splash back at you). Repeat with the remaining piece of cod. Use a slotted spoon to part the pieces of fish if they immediately stick to each other in the oil. Fry for 1 minute, then use the slotted spoon to lift each piece just above the oil and spoon some extra beer batter right over the top of the fish. Do this on both sides of each piece of fish, then allow to fry until deep golden and crispy, around 6 minutes and 30 seconds total. You can turn them once or twice during cooking if needed.
- Remove from the oil, place on the wire rack and immediately sprinkle with a pinch of salt, just to help draw out the final bit of moisture from the batter. Increase the oil temp to 200°C (392°F).
- Add the chips back into the oil and fry for 5 minutes, or until very deep golden and crisp (timings may vary a lot, so just be vigilant and fry to your preferred texture/colour). Remove and place on the wire rack. Serve with the fish and enjoy!
Video
Notes
Your Private Notes:
Nutrition
Looking for more?
You’ll find plenty more delicious comfort food like this in my Debut Cookbook ‘Comfy’