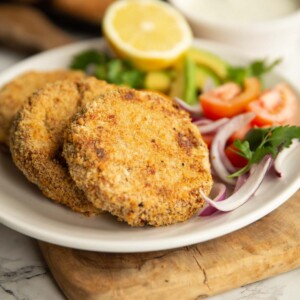
Crispy on the outside & smooth on the inside, these Tuna Fish Cakes are the perfect way to use up some cupboard staples for an easy and delicious lunch!

Mashed Potato Tuna Patties
I’ve tried out a few different versions of tuna cakes and in my opinion using mashed potato is essential. The mash potato not only bulks out the patties, but also helps bind together everything. Plus, who doesn’t love mashed potato?!
Leftover Mashed Potato
These are perfect for using leftover mash. I recommend using it straight from the fridge so it’s nice and cold/firm. This will help the patties form together. If you’re leftover mash is particularly creamy and smooth, I do recommend whipping up a fresh batch – the mash is the bulk of the patties and if the consistency is too wet the patties won’t form.
Fresh Mashed Potato
If you’re making the mash, it’s essential to not over boil the potatoes. You want them soft enough to just slice with a knife, otherwise the potato will absorb too much water and turn the patties sloppy. It’s also essential to completely steam dry the potatoes. You want as much moisture to escape the potatoes, again, so the patties are firm enough to form.
How to make Tuna Potato Patties
- Combine mash, mayo, butter and mustard.
- Add tuna, spring onion, parsley, lemon zest and seasoning.
- Mash until smooth.

Breaded Tuna Fish Cakes
Once you’ve formed the patties, it’s time for coating. A lot of recipes just fry the patties, or at the most dredge in flour and fry. However, by doing that you’re missing out on a gorgeous crispy coating. Coating in breadcrumbs gives that awesome contrast against the smooth inside of the patties.
At this stage I HIGHLY recommend popping the patties in the freezer for 10-15mins to firm up BEFORE dredging. This will ensure the patties don’t fall apart when dredging (literally nothing worse).
Panko Breadcrumbs
These are Japanese breadcrumbs which are much bigger and lighter than regular breadcrumbs. This means they go extra crispy! You’ll find them in nearly all supermarkets/grocery stores in the Asian section. You can sub regular breadcrumbs if that’s what you have.
How to bread Tuna Patties
- Coat in flour.
- Dredge in beaten egg.
- Thoroughly coat in breadcrumbs.

Pan Fried Tuna Fish Cakes (cooking option 1)
You’ll need to fill the base of a pan with veg oil and bring it to a sizzle. Fry 3 fish cakes at a time, flipping once until golden both sides. It’s important to make sure the oil is hot before frying or the patties will absorb too much oil and turn sludgy. Test with a breadcrumb before hand.
Pros
- Quick
- Not quite as dry as baking
- Arguably more crispy
Cons
- More maintenance
- Higher risk of patties losing shape
- Not as even coverage

Oven Baked Tuna Fish Cakes (cooking option 2)
Plonk the fish cakes on a greased tray and liberally spray with oil. Pop in the oven, flipping once until golden each side.
Pros
- Even coverage of crispiness
- Hold shape better
- Less maintenance
Cons
- Longer to cook
- Slightly dryer than frying
- Arguably not quite as crispy

In summary it doesn’t make a huge difference. If your patties seem slightly on the flimsy side I’d bake them just to be safe. They just are ever so slightly more dry.

Tuna Fish Cakes FAQ
How do you keep fish cakes from falling apart?
- Dry Mash – When you make the mashed potato, make sure you leave the potatoes to steam before you mash them. This will allow moisture to escape the spuds and result in a less ‘mushy’ mash.
- Freezer – If you feel like the filling is too flimsy when you form it into the patties, pop them in the freezer before you dredge them through the egg, flour and breadcrumbs.
- Hot Oil – Ensuring the oil is sizzling before you put the patties in the pan is essential to them staying together. If the oil isn’t hot, the patties will just soak it up and go mushy before they get the chance to crisp up.
Can I make these ahead of time?
Sure! You can either just form the potato patties and place in the fridge until ready to bread, or, you can bread them and place them in the fridge until ready to cook. If you want to completely cook them, just cool and tightly cover in the fridge for 2-3days and bake straight from the fridge (don’t fry again, will absorb too much oil).
Can you freeze homemade tuna fish cakes?
Yep! You can freeze before cooking and bake straight from the freezer at a lower temp (add another 10-15mins) or thaw and fry. Or, you can completely cook and pop in the freezer for a month and bake straight from the freezer (add another 15-20mins).
How to reduce mess when making fish cakes?
Whenever I’m coating anything in a batter of flour, egg and breadcrumbs, I allocate a ‘wet hand’ and a ‘dry hand’. Place the patty in the flour with the dry hand and transfer into the egg. Coat with your wet hand and transfer into the breadcrumbs. Coat with your dry hand. Voila – less mess!

What is best served with fish cakes?
Definitely serve with a sauce (I recommend Tartare Sauce). To make a full meal you can serve with fries, mushy peas or a side salad (I usually go avocado, red onion, tomatoes). To garnish I recommend a lemon wedge and an extra pinch of parsley or dill.
If you’re looking for more delicious and easy tuna recipes then definitely check out my Avocado Tuna Melts, Tuna Pasta Salad or Tuna Baked Potato (perfect for lunch!)
If you’re looking for more mashed potato recipes then head over to my Mustard Mash and Cheesy Roasted Garlic Mashed Potatoes!
Alrighty, let’s tuck into the full tuna fish cake recipe shall we?!

How to make Tuna Fish Cakes (Full Recipe & Video)
Tuna Fish Cakes
Equipment
- Medium Sized Mixing Bowl & Spatula
- 3 Shallow Medium Bowls (for dredging)
- Sharp Knife & Chopping Board
- Pot, Masher & Colander (if making mash)
- Zester/Fine Grater
- Non-Stick Frying Pan & Turner (if frying)
- Baking Tray (if baking)
Ingredients
- 1.5 cups Mashed Potato, or 16oz/450g potatoes to make mash (see notes)
- 2x 6.5oz/185g cans of Tuna, drained (preferably spring water, not oil)
- 1 cup / 60g Panko Breadcrumbs (see notes)
- 1 large Egg, beaten
- 2-3 heaped tbsp Flour
- 2 Spring/Green Onions, finely diced
- 1 tbsp Butter
- 2 tsp Mayonnaise
- 1 tbsp finely diced Fresh Parsley
- 1 tsp Dijon Mustard
- zest of 1/2 Lemon
- 1/4 tsp Garlic Powder
- Salt & Black Pepper, to taste
- Vegetable Oil, as needed (frying)
- Oil Spray, as needed (baking)
Instructions
If Making Mashed Potato
- Peel and dice 16oz/450g white potatoes and place in a pot of enough cold water to comfortably cover them. Add a hefty pinch of salt and bring to a boil until they are just about tender enough to slice. It's crucial you don't over boil the potatoes or they'll soak up too much water and the patties will be too sloppy to mould.
- Drain in a colander and allow to steam completely dry. This is crucial to allow as much moisture to leave the potatoes as possible. If you have time cool them completely in the fridge, do that as well, but the main thing is allowing all the steam to escape. Mash until lump free.
Patties
- Combine your cold mash with butter, mustard and mayo. Add in tuna, spring onions, parsley, lemon zest, garlic powder and seasoning to taste. If you're using leftover mashed potato which was made with butter you won't need to add more. Also just take into consideration how much it was already seasoned.
- Mould into equal burger-shapes, you should get 6-8 depending on size. I find scooping with a 1/3 measuring cup gives 6 equal patties. I highly recommend popping them in the freezer at this point for 10-15mins to firm up before dredging. Or at least while you set up your bowls.
Dredging
- Set up your stations: 1 bowl with flour and a pinch of salt and pepper, then 1 with your beaten egg and lastly breadcrumbs with a pinch of salt and pepper.
- One by one, delicately (but still thoroughly) coat the patties in flour, then egg, then breadcrumbs. Again, if they feel at all flimsy at this point pop them in the freezer to firm up.
Frying (option 1)
- Pour enough veg oil in a pan to comfortably cover the entire surface. Bring to a medium-high heat and when it sizzles when a crumb is dropped in, carefully place in 3 patties at a time. Allow to fry for 3-4mins (or until golden underneath) then flip and fry until golden on the other side. It's important that the oil is hot enough to 'sizzle' when the patties hit the pan. If it's too low, the patties will merely soak up the oil, become soggy and fall apart.
Baking (option 2)
- Place on a greased tray and liberally spray with oil. Bake at 390F/200C for 20-25mins, flipping once, or until golden and crispy all around (timings will vary depending on size of patties).
- See recipe notes for make ahead and freezing options.
Video
Notes
Your Private Notes:
Nutrition
Looking for more?
You’ll find plenty more delicious comfort food like this in my Debut Cookbook ‘Comfy’


I haven’t made tuna patties in years because they usually fall apart. This was the perfect recipe for delicious and perfectly formed patties. The instructions around preparation of the potatoes are especially helpful as that is crucial to the patties holding their shape. Thank you!
So pleased to hear these were a success, Lisa! Thanks so much for the review 🙂 C.
I’ve made these before and they were amazing. Just wondering if you could cook these in the air fryer? I’m guessing so ?
Hey Sophie! I’ve never tried, so can’t offer timings/temp etc, but I imagine it’ll work great in the air fryer! 🙂 C.
Thanks Chris! I’ll give it a go ☺️
I just tried cooking them in the air fryer: 15 minutes at 350C and they are piping hot inside and super crispy outside. Great recipe, everyone loved the fish cakes, including my spouse who usually despises canned tuna!
So pleased to hear these worked well in the air fryer! Thank you so much for popping back and sharing. Will give it a go myself 🙂 C.
These are excellent. I have been making tuna cakes for years and always on the look out for something different. I give these 10 stars. Just so you know I’m in the USA. This was a staple in our house when I was growing up and it was also a staple with my children. My husband had never had any until I made them and he really likes these. Thank you.
Thanks so much for the review, Beverly! 🙂 C.
Such a simple yet scrummy recipe me and my 4yo made for lunch.
Me and the children loved tucking into them with fresh veg and a side of mayo to dip them in.
Quickly made and perfect instructions.
Will 100% be making these again. A family winner for sure
Great to hear! Thanks so much for popping back for a review 🙂 C.
Rather than boiling potatoes, bake in the oven, rules out any chance of the potatoes taking on too much water.
Great tip!
Hi! Can you just use cornflour to coat these patties? I can’t use wheat. Or can you just cook ‘as is’ after the freezer part?
Thank you
Hi Cat! I wouldn’t cook without any coating, the potato will form a weird skin on in. I’d say your best best is to replace the flour with cornflour then coat in wheat free breadcrumbs (you can make your own by pulsing in a food processor). Chris.
Hi, I’ve tried your recipe – great, very light. The best I’ve cooked. The addition of mayo is the x factor. Chapeau. Tip – use a ricer. I added about 100 grams of leeks which improved the flavour considerably.
Your recipe states two tins of 185g tuna. You then drain them and realise 280g net? This is mixed with 450g of mashed potato?
I ask ’cause I’m batch cooking with 5 tins of 900g, gross, 648g net. So I have 3,240g of tuna. So I use 5,200g? of mash?
If I add add about 1150 g of leeks would you reduce the amount of mash? I know it is all a matter of taste but you might have experience of batch cooking
Hey Martin – thanks so much for popping back for a review, really appreciate it! The addition of leeks sounds awesome! To adapt the recipe for batch cooking your best bet is to use the sliding scale right next to the serving size in the recipe card. This will give you the exact measurements you need. Hope this helps 🙂
East to make but very tasty and will definitely make again. The addition of Dijon mustard added to the flavour. Great to have with a salad or mixed veg. Loved them
That’s awesome to hear! Glad they went down well. Thanks so much for popping back for a review 🙂
Could you use instant mashed potatoes ?
I haven’t tried that, but I image if you use the same amount stated in the recipe and allow it to completely cool, it should work fine. Just make sure the consistency is nice and thick like real mash or the cakes won’t form 🙂 Chris.
I did try making these with instant mashed and they definitely came out much softer and difficult to form and flip. Taste was good though.
This is such a great recipe! Instructions were really clear and helped me to achieve a yummy result. Cooked these for me and my elderly parents under lockdown recently and we loved them. Thanks for all the extra tips and info on how to ensure they turn out well 🙂 I’ll be trying out another recipe of yours soon.
That’s great to hear, Rachel! Also good to know the tips helped out, worry sometimes I waffle into too much detail, but glad to hear it helped! Thanks for popping back and leaving a review 🙂